Page 3 of 3
Re: How To: Z-Stop & Bed Leveling
Posted: Mon Nov 16, 2015 9:38 pm
by 3dPrintingMD
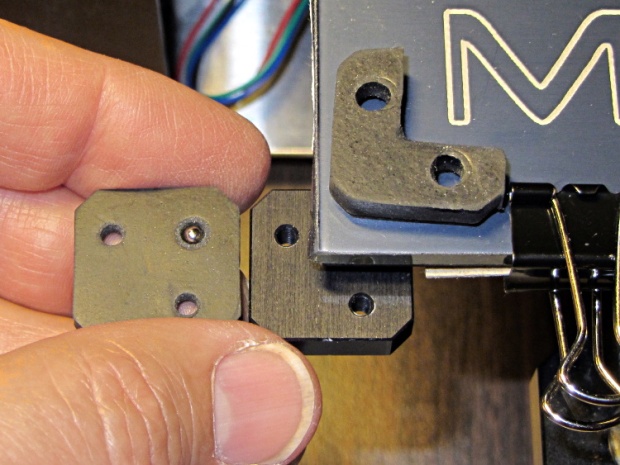
Nothing I've seen so far is flat. I have an MIC 6 plate on order.
Surface that I based my findings on where glass & zebra plate. Once I came to terms those were not flat, I went right to the print bed. While I can not confirm if that is flat or not, since those damn rubber pieces were throwing things off.
Now that I have replaced the corners with PETG printed ones, I can at least have some comfort they will be of similar size to each other. I guess I should have measured them before I put them on, to ensure that, but none the less, they can't be out as far as squishy rubber.
Re: How To: Z-Stop & Bed Leveling
Posted: Mon Nov 16, 2015 10:08 pm
by ednisley
3dPrintingMD wrote:I measured the rubber ones
That part always bothered me, too, so I put the heater plate up on steel balls:
http://softsolder.com/2013/07/16/makerg ... ort-balls/
The spider turned out to be flatter than I expected and all four balls made firm contact. That let the flexy rubber blocks constrain the motion in the XY plane (where there's no particular alignment difficulty) and the balls set a repeatable Z distance (where you care
a lot about alignment).
You could probably do the same thing with your printed supports: punch a geometric cylinder at the proper spot in the model, with a diameter that's just right for a ball, and drop the ball in after mounting the supports on the spider. You want the ball free to move under load, so the platform rides on the balls, not the plastic surrounding them.
That hack happened quite a while ago and I've since replaced the platform with a heater bonded directly to the glass that rides on the three alignment screws.
Re: How To: Z-Stop & Bed Leveling
Posted: Mon Nov 16, 2015 11:06 pm
by 3dPrintingMD
Great idea Ed. Yes I concluded the same that the spider was very flat. What really tipped me off towards the end was I took off the bed, and went about dialing in levelness to the spider, but just in the basic quad/square that is about say 3x3 or so. I was able to get it perfect. Which made me curious how this was able to be leveled so well, but once I put the bed on, it went to hell.
Re: How To: Z-Stop & Bed Leveling
Posted: Sun May 26, 2019 11:37 pm
by geddski
I seriously hate this leveling system. Can never get it right. I see why they went away from it in new versions.
Re: How To: Z-Stop & Bed Leveling
Posted: Mon May 27, 2019 4:44 am
by airscapes
dail indicator mounted where the hot end lives works real well for physical leveling...
Re: How To: Z-Stop & Bed Leveling
Posted: Mon May 27, 2019 3:22 pm
by Gwhite
Although the glass is pretty good as far as being flat, it's not necessarily uniform thickness. I measured a couple glass beds, and found that my original one was slightly wedge shaped; it was thicker on one side that the other. If I have to remove the bed for any reason, I make sure I install it in the same orientation. If it's perfectly level and you rotate it 180 degrees, it doubles the error in the glass. Of the two beds I measured, the worse case error (edge to edge) would only be 0.04 mm. That isn't huge, but it's 1/5th of the 0.2 mm layer thickness I typically use, and with a little care, it's entirely avoidable.
Re: How To: Z-Stop & Bed Leveling
Posted: Sat Dec 07, 2019 6:22 am
by oldpartsnrust
I struggled with the Z stop top nut wrench method and finally lost my 9/32 wrench and did it much easier. I used the lock nut on the bottom of the print tray and it was all around MUCH, MUCH easier. Just an F.Y.I. for anyone who is finding themselves struggling with aligning the wrench through the side of the print material feed side of the M2.