Post your advice, tips, suggestions, etc...
-
TheRyanRanch
- Posts: 41
- Joined: Wed Aug 05, 2015 4:11 am
Post
by TheRyanRanch » Sun Oct 04, 2015 3:36 am
Jules wrote:One other thing you could do to make it print just about right is to flatten out the roundness of the cylinders at the ends.
Support is hardest for that rounded shape on the bottom of a print:
The attachment Capture.JPG is no longer available
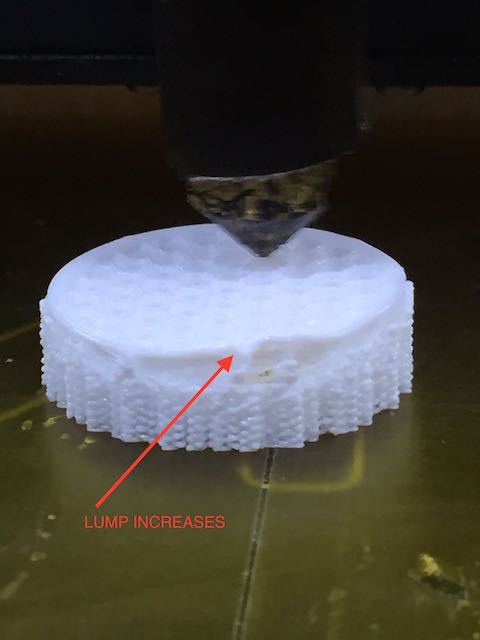
I just tried another print, and it looks like after I increased the support density and adjusted to 3 layers, the support actually seems to be working, however what I am seeing is the outer wall collapsing ? in this picture you can see a lump, this outer wall is actually higher than the rest of the print....

- RESULTS-2.jpg (11.58 KiB) Viewed 10532 times
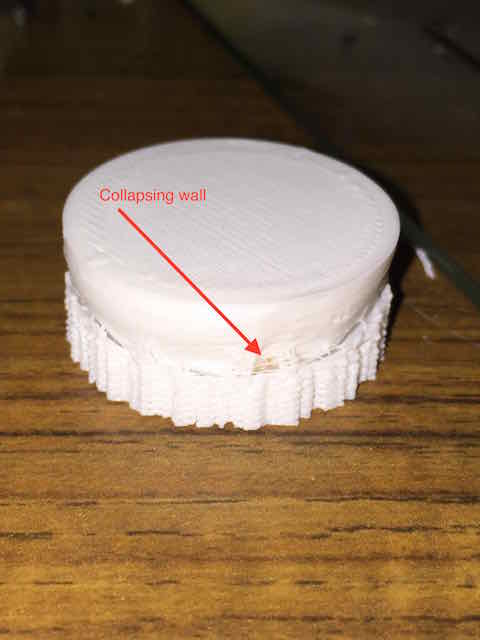
A little worse, more collapsing....
- RESULTS-3.jpg (28.7 KiB) Viewed 10532 times
Then, after a few more layers that lump goes away...
- RESULTS-4.jpg (22.69 KiB) Viewed 10532 times
and you wind up with dented looking surface....
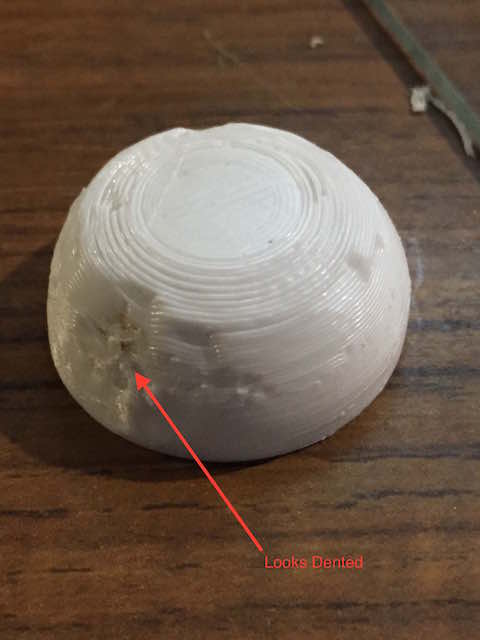
- RESULTS-5.jpg (26.66 KiB) Viewed 10532 times
-
jimc
- Posts: 2888
- Joined: Wed Apr 09, 2014 11:30 pm
- Location: mullica, nj
-
Contact:
Post
by jimc » Sun Oct 04, 2015 3:45 am
those are all heat issues. the parts is heat soaked and soft. you need to print that with something else to increase layer time and allow for the part to cool and solidify between layers.
-
TheRyanRanch
- Posts: 41
- Joined: Wed Aug 05, 2015 4:11 am
Post
by TheRyanRanch » Sun Oct 04, 2015 4:10 am
jimc wrote:those are all heat issues. the parts is heat soaked and soft. you need to print that with something else to increase layer time and allow for the part to cool and solidify between layers.
Do you mean another material?
I'm using PETG for impact strength, ABS is to weak, is there something else that comes in colors?
It sure seems like this whole thing is heat related, BTW what is a good temp for PETG, I use around 250C and tried print speeds around 50-60 mms
-
jimc
- Posts: 2888
- Joined: Wed Apr 09, 2014 11:30 pm
- Location: mullica, nj
-
Contact:
Post
by jimc » Sun Oct 04, 2015 4:12 am
no what i am saying is you cant print just that piece. you need to print 3,4,5 of them at a time or toss it on the bed at the same time as when your printing something else.
-
Jules
- Posts: 3144
- Joined: Wed Jan 21, 2015 1:36 am
Post
by Jules » Sun Oct 04, 2015 4:25 am
jimc wrote:no what i am saying is you cant print just that piece. you need to print 3,4,5 of them at a time or toss it on the bed at the same time as when your printing something else.
Never knew that heat soak was causing the pitting on those curved undersides - I'm going to have to print several of my little problematic eggs at once to see if it helps. (They're a bear.)

-
TheRyanRanch
- Posts: 41
- Joined: Wed Aug 05, 2015 4:11 am
Post
by TheRyanRanch » Sun Oct 04, 2015 4:41 am
jimc wrote:no what i am saying is you cant print just that piece. you need to print 3,4,5 of them at a time or toss it on the bed at the same time as when your printing something else.
maybe add a lot of fan cooling through the part where it builds up and out?
-
jimc
- Posts: 2888
- Joined: Wed Apr 09, 2014 11:30 pm
- Location: mullica, nj
-
Contact:
Post
by jimc » Sun Oct 04, 2015 5:04 am
fan will help. it may be enough it may not. its hard to tell how big the part is in the picture. just saying whatever you can do to give that thing time to cool.
-
TheRyanRanch
- Posts: 41
- Joined: Wed Aug 05, 2015 4:11 am
Post
by TheRyanRanch » Sun Oct 04, 2015 5:43 am
jimc wrote:fan will help. it may be enough it may not. its hard to tell how big the part is in the picture. just saying whatever you can do to give that thing time to cool.
Just finished up a print with FULL fan speed and it looks a lot better, so I am thinking this is truly related to heat, have you printed with PETG? what temps do you use?
last print

- RESULTS-6.jpg (71.72 KiB) Viewed 10510 times
-
jimc
- Posts: 2888
- Joined: Wed Apr 09, 2014 11:30 pm
- Location: mullica, nj
-
Contact:
Post
by jimc » Sun Oct 04, 2015 5:55 am
ive printed petg a couple times.

i run the esun stuff at 245-255. the heat issue is not really a plastic type related thing but rather a 3d printing thing in general. no matter what plastic your using, as soon as it got too hot it will get soft and move around. before the next layer goed down you want the base or layer prior to be cool and fully hardened back up. petg will still adhere to iteself with a cooling fan. dont use a fan with abs, polycarb, nylon and a few others. another trick is to just print a small 10x10 cube the same height as you model. in s3d apply a seperate process to it but turn the speed waaaaaay down so it barely moves. this way your printing a sacrificial item that doesnt require alot of plastic but adds a bunch of cooling time.
-
TheRyanRanch
- Posts: 41
- Joined: Wed Aug 05, 2015 4:11 am
Post
by TheRyanRanch » Sun Oct 04, 2015 6:01 am
jimc wrote:ive printed petg a couple times.
i run the esun stuff at 245-255. the heat issue is not really a plastic type related thing but rather a 3d printing thing in general. no matter what plastic your using, as soon as it got too hot it will get soft and move around. before the next layer goed down you want the base or layer prior to be cool and fully hardened back up. petg will still adhere to iteself with a cooling fan. dont use a fan with abs, polycarb, nylon and a few others. another trick is to just print a small 10x10 cube the same height as you model. in s3d apply a seperate process to it but turn the speed waaaaaay down so it barely moves. this way your printing a sacrificial item that doesnt require alot of plastic but adds a bunch of cooling time.
How about HPB? I set mine to 70C

