I have a project that requires a housing for a small battery powered circuit. I want to use threaded brass inserts for the cover screws so the threads will hold up for multiple battery changes. The eventual goal is to make a couple dozen of the things.
After some research, I ordered inserts, a soldering iron & special tip from McMaster Carr:
https://www.mcmaster.com/heat-inserts
I have a Dremel drill press, and printed an adapter to hold the iron from Thingiverse: https://www.thingiverse.com/thing:3937099
I experimented with dimensions for the printed "boss" the inserts go into, and I'm getting the right hole size. I've done a few tests, and although it's working, and the inserts appear to be nice & solid, there are a couple of issues I'm seeing:
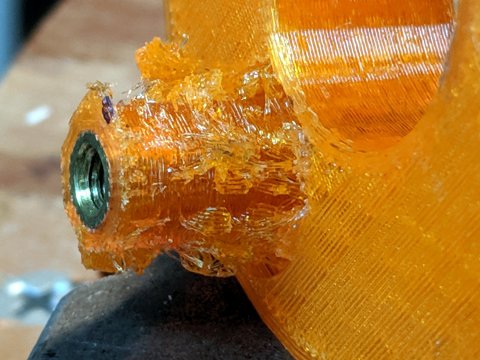
1) Even with a bevel at the top, the molten plastic oozes out around the insert, leaving a significant raised ridge. This is with the top of the insert ~ flush with the top of the boss. The ridge has to be trimmed off with an Xacto knife at this point, which will be a pain in the neck in "production".
2) Once I have the insert level with the top of the boss, when I lift up the iron, the insert wants to rise up out of the hole, and I have to push it back down a 2nd or 3rd time. It's like it's being pushed out by the continuing expansion of the plastic. The inserts are tapered, so sideways expanding plastic may tend to lift them. The threaded hole goes all the way through the insert, and the hole they go into extends a good ways below the insert, so I don't think they are being lifted by pressure from below.
I'm using eSun PLA+ which prints ate ~ 210C. The soldering iron is a cheap Weller 40W iron with no temperature control. It's advertised as going to well over twice that. My suspicion is that the tip is WAY too hot. I have an old Variac that I can use to turn it down, and I'll try that next.
In the meantime, I figured I'd see if there were any tricks or advice from the forum that could help shorten the learning curve.
Thanks!
Heat Insert Technique?
Re: Heat Insert Technique?
I am just a hobbies and have used inserts with a few things I have designed. I ran into most of the issues you describe, never bothered with the drill press as was not doing assembly line. Most of what I did was with the insert in the back side, so the screw would pull the insert into the boss. To be honest I like using ABS and just tapping the holes that need to be threaded, much cleaner and works really well for me. Good luck with your production, the only tip I can give you is lower the heat and don't try and drive it in has to melt in and has to cool or it will move..

Re: Heat Insert Technique?
Love 'em, but they're definitely finicky.
The real problem comes from 3D printing's crappy tolerances: ±0.1 mm in hole diameter is the difference between "fits OK" and "falls out".
For low-stress applications, I just ram 'em into place with the drill press:
https://softsolder.com/2016/03/07/vacuu ... a-platter/

Epoxy works great when you really care:
https://softsolder.com/2016/03/14/knurl ... anchoring/
In fact, the plastic fails long before the epoxy gives up:
https://softsolder.com/2019/07/12/threa ... struction/
The trick, if any, is to use about half as much epoxy as you think it needs, no matter how little you think it needs.
A sack with a thousand M3 inserts is on its way around the planet even as I type …
Re: Heat Insert Technique?
A quick update: I dug out my thermocouple hardware, and found my old Variac.
I don't have a small thermocouple probe that can go as high in temperature as the iron on full voltage. I have a 12" stainless steel probe that I held against the side of the insert tip, and that got up to 320C. Between the poor thermal contact & the cooling from the probe, it's got to be significantly hotter than that. My guess is that even 320C is WAY too hot, and is probably the main cause of my problems.
I set the Variac to 60 Vac, and used a smaller surface probe that should be much more accurate, but can't go above 260C. It read 192C, which might be hot enough for regular PLA.
I'll try a few inserts at 70 Vac. That should get me pretty close to the extrusion temperature (215C) for the eSun PLA+ I'm using.
Re: Heat Insert Technique?
OK, that makes a HUGE difference. I need to fine tune a few things, and I'll take some pictures. I was a bit more patient in letting the temperature probe stabilize, and at 70 Vac, the Weller SP40NKUS iron from McMaster settled at ~ 235C. The insert goes in nice & smooth, with no "bounce back", and no plastic oozing out around the top. I suspect it also self-centers better when it isn't totally liquifying the plastic.
Re: Heat Insert Technique?
i've had good experience 3d printing holes to the tap drill diameter which always print a little smaller, then cleaning the hole with the proper size tap drill held in either a pin vise or a 1/4 inch jacobs chuck I keep for this sort of thing, then tapping for the thread I want. I do a lot of 10-32, M3. M2.5, and occasionally M6 connections this way and as long as I don't lean on them they are fairly secure. They all get Nylon socket head cap screws or cheese-heads.
I also 3d print inserts to hold 3d printed panels where the insert is glued into foam r/c airplanes or balsa. It's very hard to get a clean hole in foam, but if i secure the inserts to the plate it will be holding, apply some glue-gun glue then quickly insert the thing where it needs to be, I get good results.
I use CA if the insert is going into balsa and very little as the gentleman suggests.
I would think drilling out a hole to size to receive a brass insert then using glue would work fine, but I haven't tried it.
Threaded holes in PETG work quite well if the thread size and depth can be controlled to get the amount of grip you need.
Re: Heat Insert Technique?
I sell a part I make for a knife sharpening system that has a threaded hole for a 10-32. I also made a jig to hold the part so the tap can be inserted in a cordless drill and run into the hole. Luckily the hole can go straight through and it is a small part so one can thread them fairly fast while using compressed air to remove the shavings as you zip the tap through the plastic but I digress.. sorry.
Re: Heat Insert Technique?
I've had considerable success using tapped holes in my prints, or making cavities for conventional metal nuts. Especially for larger screws, I print the threads, and then clean them up with a tap. That works fine unless you expect to be disassembling & reassembling things a lot.
For this job, I didn't have room to slip a metal nut into the model, and I wanted something stronger and wear resistant than threads in the plastic. These will also be in the hands of people who don't necessarily understand the limitations of the threads, and they would likely strip them out in short order. Hence the decision to try the heat press inserts.
I ended up experimenting with three different tips. The tips McMaster Carr sells to go with their soldering iron are very short, which provides a low thermal resistance to the insert, but it also doesn't allow installing inserts down inside a small cavity, or a very good view of what you are doing. I got a set of inserts from Amazon that are designed for a Hakko temperature controlled iron, but are also supposed to be compatible with the Weller from McMaster. They are longer, which is nice, but they don't have a shoulder and they can slip up inside the Weller, which messes up the depth setting. I ended up making a hybrid that has a shoulder like the McMaster, but the longer reach of the Amazon tips.
Here's a photo of the three tips. "A" is the McMaster, "B" is from the Amazon set, and "C" is my home brew hybrid.
Using some means of lowering the temperature of the Weller iron is essential. At 120 Vac, the tip temperature was over 320C, and I got a lot of plastic oozing up around the insert, but the insert also wanted to float up out of the hole.
A solid state dimmer/motor-control would work, but I have a Variac variable transformer, so I used that. Because the power (and therefore heat) goes up as the square of the voltage, it's not going to be linear. I got a better thermocouple probe, but it was still hard to get consistent contact with the small tip, so the readings are only approximate. I took temperature readings at three reduced voltage settings, 60 Vac (185C), 65 Vac (209C), and 70 Vac (225C). The temperature at a given voltage also varied significantly with the different tip designs.
Here's a photo comparing the results at the 4 different voltage settings:
The nominal printing temperature for the eSun PLA+ I am using is 205C-225C. The insert went in at 185C, but it took an uncomfortable amount of force. There was no sign of oozing around the insert. At 209C, the insert went in smoothly, with only a tiny hint of oozing that may just be from having the depth adjusted a little deep. At 225C, I got significant oozing, but no bounce-back where the insert tried to push back up.
If I had it all to do over again, I think using the Amazon tips with the Hakko iron's precise, direct temperature control would work really well. From my admittedly crude experiments, you want to run the tip at about the nominal printing temperature (hardly a surprise).
The diameter of the hole is important, and most places recommend a bevel at the top to provide space for whatever oozing you do get. The bevel I have at the moment isn't a good match for the bottom of the insert, and they want to tip. It's a pain in the neck to get them started straight, and I need to fix that before I go Into "production". Once that is sorted out, I think installing them will be pretty easy, repeatable & strong.
For this job, I didn't have room to slip a metal nut into the model, and I wanted something stronger and wear resistant than threads in the plastic. These will also be in the hands of people who don't necessarily understand the limitations of the threads, and they would likely strip them out in short order. Hence the decision to try the heat press inserts.
I ended up experimenting with three different tips. The tips McMaster Carr sells to go with their soldering iron are very short, which provides a low thermal resistance to the insert, but it also doesn't allow installing inserts down inside a small cavity, or a very good view of what you are doing. I got a set of inserts from Amazon that are designed for a Hakko temperature controlled iron, but are also supposed to be compatible with the Weller from McMaster. They are longer, which is nice, but they don't have a shoulder and they can slip up inside the Weller, which messes up the depth setting. I ended up making a hybrid that has a shoulder like the McMaster, but the longer reach of the Amazon tips.
Here's a photo of the three tips. "A" is the McMaster, "B" is from the Amazon set, and "C" is my home brew hybrid.
A solid state dimmer/motor-control would work, but I have a Variac variable transformer, so I used that. Because the power (and therefore heat) goes up as the square of the voltage, it's not going to be linear. I got a better thermocouple probe, but it was still hard to get consistent contact with the small tip, so the readings are only approximate. I took temperature readings at three reduced voltage settings, 60 Vac (185C), 65 Vac (209C), and 70 Vac (225C). The temperature at a given voltage also varied significantly with the different tip designs.
Here's a photo comparing the results at the 4 different voltage settings:
If I had it all to do over again, I think using the Amazon tips with the Hakko iron's precise, direct temperature control would work really well. From my admittedly crude experiments, you want to run the tip at about the nominal printing temperature (hardly a surprise).
The diameter of the hole is important, and most places recommend a bevel at the top to provide space for whatever oozing you do get. The bevel I have at the moment isn't a good match for the bottom of the insert, and they want to tip. It's a pain in the neck to get them started straight, and I need to fix that before I go Into "production". Once that is sorted out, I think installing them will be pretty easy, repeatable & strong.
Re: Heat Insert Technique?
That's nice work!
Instead of a bevel, would a cylindrical recess 0.5 mm larger than the insert and two or three threads deep (0.5 mm, max) suffice? Set the insert into the recess, resting solidly on its bottom, then nail it with the heated tool.
I don't do enough inserts at any one time to justify your setup, but now I know what to do should it happen!
Re: Heat Insert Technique?
I thought about that. I'll experiment a bit & report back. There's probably a dozen different ways to deal with it. I'm hoping that I can come up with a geometry where I can pre-load the inserts nice & straight with thumb pressure, and then put them on the press & seat them without having fuss with each one. Each housing has 6 inserts, so it's worth spending a little time to get it right.
Of course, at this level of detail, every brand & size of insert will be a bit different. At least I can flatten the learning curve a bit for the next variation.
Of course, at this level of detail, every brand & size of insert will be a bit different. At least I can flatten the learning curve a bit for the next variation.