Unsure what is causing this print problem

Ask the MakerGear community for assistance...
User avatar
Tim
Posts: 1205
Joined: Thu Apr 10, 2014 2:19 pm
Location: Poolesville, Maryland
Contact:

Re: Unsure what is causing this print problem

Post by Tim » Sat Dec 26, 2015 3:20 am

Thanks, Jules. :)

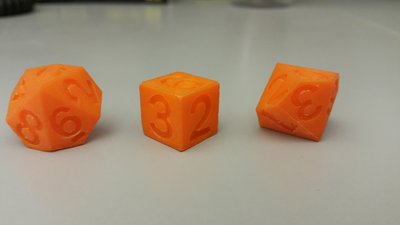
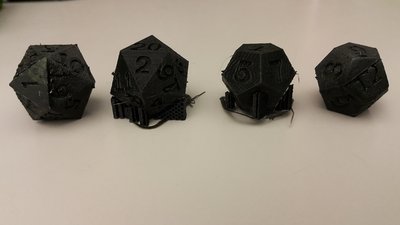
I would mention that having modeled those dice Jules referenced, I'm pretty familiar with the overhangs. 8-sided dice are only about 20 degrees off of the vertical and really shouldn't cause a problem. I didn't start getting sloppy undersides of overhangs until I printed the 20-sided die with an overhang of > 45 degrees---but still, I was able to print it without support at a layer height of 0.2 mm.

I guess I should mention that while theoretically, going to 0.1mm layer height should allow greater overhangs, it can also cause problems because the layers are thin and tend to curl up at the edge of the overhang, and the problems caused by the curling can accumulate the more layers you go up.

I looked at the pictures you posted, though, and I think the problems may be caused more by the tapered corners. While the flat of the 8-sided die is only about 20 degrees off of vertical, those tapered corners are a lot steeper. So I think the problems start there and just keep accumulating layer by layer.
The 10-sided die also has very severe angles caused by the way it's designed with the interecting cylinders along the mid-line. A lot of people make dice models with rounded edges and corners; I guess because people don't like to grab dice with sharp edges so much, but rounded edges (or beveled, or tapered as in this case) do make printing more difficult.

User avatar
Jules
Posts: 3144
Joined: Wed Jan 21, 2015 1:36 am

Re: Unsure what is causing this print problem

Post by Jules » Sat Dec 26, 2015 5:43 am

thaumx wrote:
As you can see on the pictures, overall quality is much better. I still get that protruding-looking area near the print bed, like that face has extra material, which ruins the die. The early overhang isn't very neat either. I was using the default 4 solid top and bottom layers, but I think reducing them to 2 would help, a smaller mass of solid hot plastic keeping things warm. I used 70 or 75% infill on this print, because I want the dice to have a more substantial weight. (should improve randomness in the dice, and has a nicer feel.) I think I should try reducing that as well for heat reasons, though it does increase print time. For some reason, Simplify3D likes to start a new layer on the same object that it finished the last layer on, but varies which object it finishes with. I should probably figure out how to make it start a new layer on one of the dice that are cooler. I'll put that on the list for when I'm trying to figure out slowing the overall print speed.

Thanks again everyone for the help :D
Oh yeah, that looks a lot better. That's about as good as you're going to be able to achieve without hitting it with some serious extra fan pointed directly at the areas I've got circled below.
pic1.jpg
They've got a really steep angle there.....I tried to do the same with some little egg shapes that i was trying to print - the rounded bottoms just about made them impossible. Finally wound up pointing a small hand held fan directly at the rear underside from a couple of inches away, while it printed. That's just the normal PLA curling on overhangs from not cooling off fast enough.

Be sure to read Tim's post about the beveled edges on the dice - that's introducing a steeper angle on the edges that is going to make it pretty tough. One other thing that you might try is using a single dense support layer with cross-hatched support. (Set the angles to -45 degrees and 45 degrees on the support.) I find it supports undersides a little bit better. Bit of a pain to remove though. And extend the support out about a mm beyond the edges of the dies.

Looking good though, you're def. on the right track. :)

thaumx
Posts: 6
Joined: Thu Dec 24, 2015 12:58 pm

Re: Unsure what is causing this print problem

Post by thaumx » Sat Dec 26, 2015 6:37 am

With all of your help, I think I'll be on the right track for my next attempt. Thanks :D

I'm going to redo the models completely. I really didn't want to give up the intricate designs, part of the fun of designing your own was having dice that are "cooler" than the standard plastic polygons. We mostly use GameScience dice in my campaign, so we're used to the sharp corners. They won't be fancy, but sharp-edged dice will get the job done. Originally, my models resembled something like these thorn dice by plasticwombat:
Image
But I revised them over and over making them more simple to try and print better. Simple polyhedral have their own appeal though. I used to make videogame mods, mostly for the Bethesda franchises, so I made a design, then immediately redesigned just so it could be possibly printable. :lol:

I will be trying a new set soon. I'm going to make simple sharp-edged polyhedrons, and change the font to helvetica with a smaller recess. The wider curved "tops" of the dice did allow for a large font width before crowding the edge, but at the size I'm printing it's not really an issue anyway. I will be reapplying masking tape, and re-leveling the bed. Aside from that, the only major changes I'll make initially is to the bottom and top layer height, and possibly bumping up the extrusion temperature for layer 1. I need to figure out how to control overall print speed, and the object order for new layers, but that's a software thing so not a big deal.

d20s will still be a pain, and possibly d12s, but I'll burn that bridge when I get to it. I'll post the results when I'm done, hopefully I'll be able to start experimenting with the finish.

User avatar
Spotopolis
Posts: 79
Joined: Tue Apr 29, 2014 9:17 pm
Location: Colorado

Re: Unsure what is causing this print problem

Post by Spotopolis » Sun Dec 27, 2015 1:27 am

Speaking of which, I've noticed that the build platform seems to lose its level rather quicker than I expected. I've noticed that after a few hours of print time if I check the level, it is no longer true. I don't really know what the acceptable amount of unevenness is yet, but the bed is noticeably not level after 10 hours or so of print time. I suppose because we're dealing with small fractional turns of the leveling screws, like a 1/8th or even 1/16th of a turn, it's not that surprising given all the moving the platform does. I do kind of wish the screws had a flatter thread though, the final adjustments I find are 1/32nd to 1/64th of a turn, so fine that I have to make several attempts to get it right. :?
Two things that might help since that does seem especially fast to lose level. First is to start with all three screws all the way in so they are snug and then level from there. The tension provided by the springs helps them from rotating.

The other is to make sure to not pry when removing the print. If prying is needed, remove the glass and then do what you need. This Cricut spatula tool is great for removing prints because it's thin enough and flexible to break the seal between the part and the bed without having to pry. http://www.amazon.com/Cricut-Tools-Craf ... atula+tool

thaumx
Posts: 6
Joined: Thu Dec 24, 2015 12:58 pm

Re: Unsure what is causing this print problem

Post by thaumx » Tue Dec 29, 2015 7:45 am

Busy weekend!

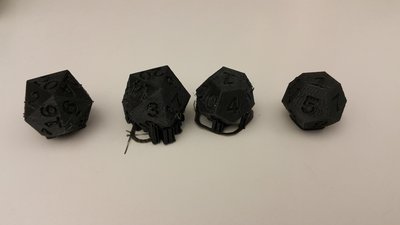
I was finally able to get the fewer-sided dice printing to a level good enough for me. I now have 6 of each, d6, d8, and d10. I've cleaned them up, which took a good deal longer than expected, particularly for the support printed into the number 1 which faces down on all the dice. I also tried printing a batch of d12s and d20s. I used the same design, essentially, as the other smaller dice. I used essentially the same settings as the smaller dice, though these are larger because I wanted to keep a good-size font. They didn't turn out as bad as my early attempts, but there's definitely some of that distortion around the early layers. The main things that changed were 1) new color filament, same source (MakerGear), 2) slightly different infill amount, though I'm not certain. If so, it was a small change, like 5%. 3) I discovered that my split AC unit in the room with my printer stopped working, but I'm not sure if that happened during or after the print. It's a 3-month-old expensive DC inverted model too. :? The rest of the house keeps the room from getting actually hot, but because the door stays closed to keep kids and unwary cats out, it did get several degrees warmer. Pictures below.

Spotopolis: I tried your suggestion of fully tightening the leveling screws, that does seem to help. I also noticed that my glass plate seems to not actually be flat. :shock: I use a piece of thin printing paper to level, moving it to feel an equal amount of drag between the nozzle and bed. when I do this at my axis leveling points, i get the same level. I noticed that when I check the level in the center of the platform, there is considerably more drag, meaning the gap is smaller. For now, I'm chocking this up to the masking tape not having even thickness. As for prying, that's a good point. I try not to put any force on the build plate, but the pieces really stick on there. (but I still occasionally get a piece to separate, go figure) The method I've been using is to brace the Y axis so that pushing in my tool doesn't shove the platform around, and then wiggle in a fine-scale sculpting tool. It's a flat squared spatula type, made of surgical steel. I think I will pick up the tool you linked and give that a go, though it'll be a while before it arrives.

I'm still debating how I'm going to go about finishing these. The amount of work to get good clean edges and everything makes me hesitant to experiment with them. I'll probably print out a few test objects. I'm torn between acrylic resin and a UV hardened plastic resin. The UV is considerably more expensive, but also would be less work and solidifies clear, so could have some neat effects. I'll share my finished items when I'm done.
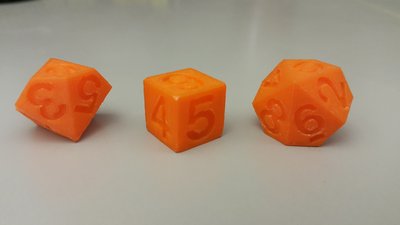
20151229_160659.jpg
cleaned up d6, d8, and d10 view 1
20151229_160726.jpg
view 2
20151229_160937.jpg
d12 & d20 as printed, 2 with supports still attached
20151229_161006.jpg
view showing surface on print bed

Post Reply