Getting PETG to stick

Re: Getting PETG to stick
whoops! didnt realize there was a giant thread dedicated to this topic. I'll peruse that one before asking any more questions! Thanks guys

Re: Getting PETG to stick
All of them, I think. I've only used PLA, PETG, Wood and PVA, but others have used ABS. It's all written up in that thread. 

Re: Getting PETG to stick
Try 140 on first layer and if that helps then your Z gap is still off.
-
Matt_Sharkey

- Posts: 347
- Joined: Mon Oct 20, 2014 3:10 pm
Re: Getting PETG to stick
I've printed very reliably on glass at 90C to 100C with 250+ hotend temp for black and natural PETg.
first layer is .2mm and i make sure that it goes down at a bit higher than .2mm First layer typically is .21mm
Extrusion width is .40mm and I make sure the multiplier is a bit thin, layers usually measure .39mm wide.
first layer is .2mm and i make sure that it goes down at a bit higher than .2mm First layer typically is .21mm
Extrusion width is .40mm and I make sure the multiplier is a bit thin, layers usually measure .39mm wide.
Re: Getting PETG to stick
PCS, I'm not sure what you're referring to about 140, please elaborate.
Maybe I'm crazy, but if I'm printing the calibration print, and I have my layers set to .200, 100% height and width and the print is coming out at 2.00mm exactly, then I don't see how my z height could be off. Maybe theres something I'm not considering.
I was under the impression that you want the first layer to be squished a TINY bit, as is 97% of the default layer height. I'm using the v6 hot end with its original .4 nozzle, going for .48 and .5 extrusion widths, depending on the piece.
I've ordered a piece of PEI and the tape to go with, I'm gonna give that a go
Re: Getting PETG to stick
140 will give you a thicker first layer. Only time I have ever had adhesion issues with petg and hairspray was when the first layer was a bit loose and I did not get enough squish. And yes you can get perfect Cal squares and still be off on z gap. The first layer needs to be squished slightly especially for larger prints.
Re: Getting PETG to stick
So, as for the 140 value, is that first layer extrusion width and 100% first layer height then?
Would you mind explaining how the z height can be off if the cal prints are coming out according to spec? I'm using the cal squares as a datum here, so if there's something that I'm missing then please inform me so I can refine my setup procedure. I don't do a z gap check, and heres my logic behind that, unless you're checking your height with everything at operating temperature then you're not getting a proper measurement, because thermal growth with close that gap a bit once you're actually printing. Problem is, that when your hot end is at full temp, you're oozing material out and that makes getting a reliable reading difficult, which was why I opted for the dial indicator setup and calibration prints method.
With that said, how are you (PCS) and everyone else doing your calibrations before beginning a print, especially the high resolution prints (sub 100)
I'm eager to learn how to improve my process so any contribution is appreciated

Re: Getting PETG to stick
actually a calibration cube tells you nothing about first layer, only all other layers. if your slicer is telling the printer to extrude "x" amount of material then the extrusion width is only governed by the bed gap. assuming the printer is extruding a consistent amount of filament from the nozzle then the tighter your bed gap the wider the width the line will be. the bigger the gap the narrower and more round it will be. you need to get it so the first layer extrusions are just touching one another. not round, and not pancake flat.
Re: Getting PETG to stick
Not sure which slicer you use but a good example is the setting in slic3r for first layer height which is typically set larger than the rest of the layers for improved bed adhesion. The slicer knows this and sets enough layers to still come out at the right height.

Re: Getting PETG to stick
Which tells you everything you need to know, because the measured wall height will equal the modeled height only when the platform is exactly the correct height at the start. That's what the slicer does for a living: makes the G-Code reproduce the model.jimc wrote:a calibration cube tells you nothing about first layer, only all other layers.
Suppose the model calls for a 2 mm wall: the top layer will emerge with the nozzle 2 mm above the Z=0 coordinate. If the platform starts with a mechanical offset, so that Z=0 doesn't correspond to the surface, then the wall can't be the correct height by the final layer.
I have Slic3r set up to make the first layer exactly like all the others: same height, same width. With the initial gap set so that Z=0 coincides with the platform, everything comes out exactly right: good adhesion (with hairspray) and accurate overall dimensions.
Here are two calibration squares that should be 5.00 mm tall. The one on the left measures 4.98 mm, the one on the right is 4.85 mm due to a slightly tilted platform:
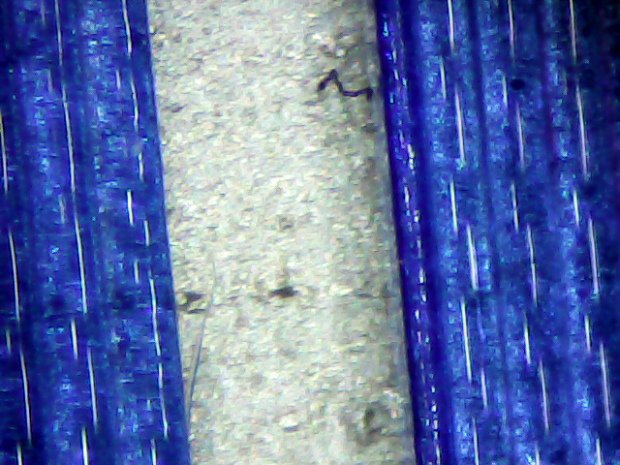
You can see the difference in the first layers (facing each other across the middle of the image): all the layers in the just-right square on the left are the same, while the too-short square on the right has a mashed first layer.
I've done some objects with 0.10 mm layers atop a 0.2 mm first layer, but I have no idea what happens when you tell it to make an extra-tall first layer; if the additional thickness isn't a multiple of the layer thickness, then I don't know where it would make up the difference. You can certainly use a compensating platform offset so the first layer comes out wrong and the overall height is correct, but that way lies madness (at least for me).
Slic3r kvetches when you try to set the first layer height to exceed the nozzle diameter, so 0.20 mm layers with a 200% first layer won't work with a 0.35 mm nozzle.