Hi guys. I am having troubles printing some threads on this part and I am not sure what to do about it. It's only the threads that are giving me trouble. I am happy with the rest of it. Does anyone have any tips or things I should try in getting these threads printed a little better. The part comes from http://www.thingiverse.com/thing:92824/#files
I am using rsilvers profile called "M2_PLA_0.25mm_Medium-v1.0.fff" that I found on http://www.thingiverse.com/thing:269637
Thanks,
-Dan
Help printing threads on this part
Help printing threads on this part
- Attachments
-
- model.PNG (64.64 KiB) Viewed 11148 times
-
- threads.PNG (646.54 KiB) Viewed 11148 times

Re: Help printing threads on this part
Split it in half, add alignment holes, print the pieces lying down, then glue them back together:nelsond6 wrote:getting these threads printed a little better
http://softsolder.com/2013/11/07/broom- ... ientation/
Doing it vertically produces horrible results:

Lying down, there's no problem:
Printing them flat also aligns the extruded filament so that the part won't fracture perpendicular to the thread axis. For my broom handle repair, there's a carriage bolt down the middle to take the stress; a pure plastic design needs all the help it can get...
Re: Help printing threads on this part
Looks like the threads could be too small for the layer height you are using (there seems to only be about 3 layers per thread). You could try lowering the layer height.
Also appears that the weird section aligns with all the layer-start 'pimples' lower down. There should be an option somewhere in the slider to randomize layer start positions. That spot is also where there will be a weird seams in the layers, as you are trying to print a spiral using flat layers, there is always going to be a seam somewhere. Higher resolution layers, and the randomized starts should help you get to somewhere closer to usable.
I have had success printing threads in the past, but they tend to need to be courser than the ones you appear to be trying.
Re: Help printing threads on this part
Thanks Ed and benavery. I will first try again with what benavery suggested. If it doesn't work out, I will have to do what Ed suggested and split it down the middle. My current modeling software (MoI) doesn't support the import of stl files so I am going to have to find something to split the stl file up. Anyone have any suggestions on software that could do this?
-Dan
-Dan
Re: Help printing threads on this part
if all you need is a simple plane cut, you can do this in pretty much any slicer by orienting the model so the part you don't want is under the bed. Duplicate the model and cut it the other way to get the other half. You will need to be careful on your positioning to make sure both models are cut in the same place.
Otherwise, Meshlab works well for editing STLs
Otherwise, Meshlab works well for editing STLs
Re: Help printing threads on this part
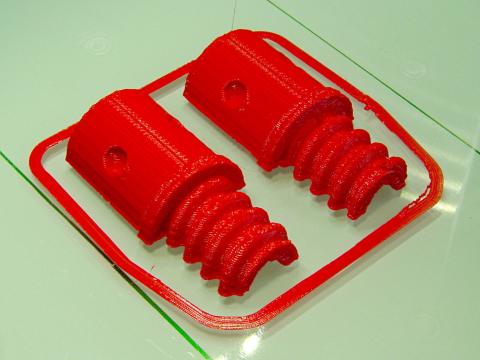
Thanks everyone. My 4 year old son and I are super happy. Doing what Ed suggested really cleaned up the threads. Thanks jsc for the tip on just rotating the model in S3D.
@benavery, I first tried what you suggested and lowered my layer height and it didn't seem to help any. Thanks anyway for chiming in.
Now all I need to do is figure out what the best glue is for PLA and how to hide the seam in the printed part.
-Dan
@benavery, I first tried what you suggested and lowered my layer height and it didn't seem to help any. Thanks anyway for chiming in.
Now all I need to do is figure out what the best glue is for PLA and how to hide the seam in the printed part.
-Dan
- Attachments
-
- good threads.PNG (795.32 KiB) Viewed 11109 times
Re: Help printing threads on this part
Ed and jimc turned me on to IPS Weld-On #4, which is a solvent for PLA. It melts the parts and welds them together. Super strong. You will want to exercise some caution, though, as it is water thin and difficult to administer. I use a syringe. They also sell dispenser bottles with hypodermic caps, but the syringe is easier for me to fill and unfill.
If you don't want to play around with strange solvents, I like two part epoxy (Loctite heavy duty, in the two big separate bottles), and Bob Smith Instacure gap filling superglue along with a spritz of Bob Smith Instaset accelerant on the part that doesn't get the glue applied to it. Some people say that superglue doesn't work well with PLA for them, but I have found it to be plenty strong for lots of things, and the accelerator really makes the set time very fast.
If you don't want to play around with strange solvents, I like two part epoxy (Loctite heavy duty, in the two big separate bottles), and Bob Smith Instacure gap filling superglue along with a spritz of Bob Smith Instaset accelerant on the part that doesn't get the glue applied to it. Some people say that superglue doesn't work well with PLA for them, but I have found it to be plenty strong for lots of things, and the accelerator really makes the set time very fast.

Re: Help printing threads on this part
Don't be silly, you don't have to split and glue threads. Just print multiples at once.
These are ABS @ 0.08mm, printed vertically, 4 at once on a raft.
These are ABS @ 0.08mm, printed vertically, 4 at once on a raft.
- Attachments
-
- 2014-12-11.jpg
- (1.21 MiB) Downloaded 520 times
Custom 3D printing for you or your business -- quote [at] pingring.org
Re: Help printing threads on this part
If you wanted to print buttress threads, that'd be the ticket, but those aren't really suitable for use with a standard nut. The problem isn't the vertical resolution, it's the lack of support on the bottom side of the thread form: notice the difference between the upper and lower sides of the thread.insta wrote:Just print multiples at once.
Splitting the "bolt" in half won't work for fine threads, though, because the XY resolution isn't good enough. In round numbers, the thread crests will be 0.5 mm, which means you can't have a pitch much less than 2 mm; a 1/4-20 or M10-1.5 bolt pushes the limits pretty hard.
If it's at all possible, embed / epoxy a real metal screw in the part and move on...