Z-stop light still on at layer 3

Ask the MakerGear community for assistance...
Post Reply
dramsey
Posts: 124
Joined: Tue Feb 16, 2016 6:07 pm

Z-stop light still on at layer 3

Post by dramsey » Thu Mar 31, 2016 5:19 pm

I was printing this Ford table stand (some day, I will print things other than Ford-related items). The print was going well although I noticed the head seemed to lightly hit parts of the model during rapid transits across existing sections.

Then I noticed that although Layer 3 was printing, the Z-stop LED was on:

Image

Initial layer height 99%, Z-offset -0.14mm, layer height 0.20mm. I noticed that when the head lightly touches parts of the model during transits, hey, it tends to drag a spider-web string from the strike point.

Is this normal? I'm thinking "No."

User avatar
PcS
Posts: 667
Joined: Mon Mar 09, 2015 12:19 pm
Location: Michigan

Re: Z-stop light still on at layer 3

Post by PcS » Thu Mar 31, 2016 5:35 pm

You need to set your z off set to zero. Z off set is for advanced users. You set the z stop with the bolt. So that the bed homes to the correct z gap below the nozzle. You home the machine and slide your feeler gauge between the end of the printers nozzle and the heated bed. Adjust bolt so bed stops correctly .

dramsey
Posts: 124
Joined: Tue Feb 16, 2016 6:07 pm

Re: Z-stop light still on at layer 3

Post by dramsey » Thu Mar 31, 2016 5:41 pm

PcS wrote:You need to set your z off set to zero. Z off set is for advanced users. You set the z stop with the bolt. So that the bed homes to the correct z gap below the nozzle. You home the machine and slide your feeler gauge between the end of the printers nozzle and the heated bed. Adjust bolt so bed stops correctly .
I have heard conflicting advice from other users here: use the Z stop bolt to get it "close", then print calibration cubes, and use Z offset for fine-tuning.

In any case I'm still wondering about the original question, 'cause I can't get the math to add up: the machine would home Z when the print starts, then offset by -0.14mm. But since each layer is 0.20mm, the third layer should start printing at -0.14 + 0.40mm, or 0.26mm beyond Z "zero". Why is the light still on?

I s'pose when this print is finished I can check and see if the Z bolt is loose.

User avatar
Jules
Posts: 3144
Joined: Wed Jan 21, 2015 1:36 am

Re: Z-stop light still on at layer 3

Post by Jules » Thu Mar 31, 2016 6:37 pm

PcS is pointing out that the Z-Offset is supposed to be used for fine-tuning, not to move the machine over long distances into position for printing. Your Z-Offset is very high - you're moving the bed through three quarters of a layer. If you use a Z-Offset for that much movement, it can make all of the other settings difficult to control.

As you're seeing, unfortunately. :?

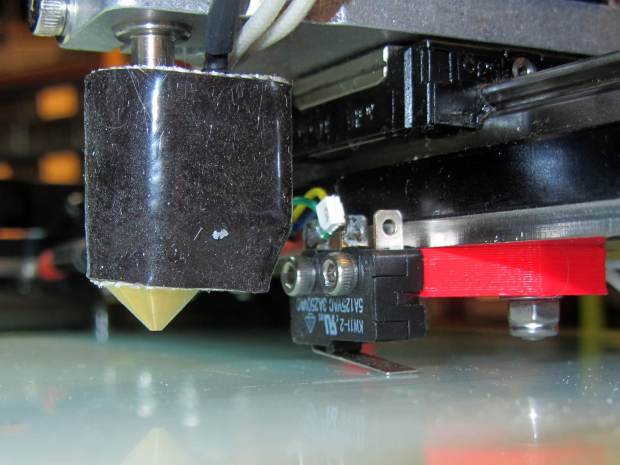
But here's the bad news....in order to change that, you are going to have to loosen the Z-Stop nut and lower the bolt head. Not by much, about an eighth of a turn. Only then will you be able to re-set the Z-Stop by dropping the nozzle down. (And remember to retract the filament and clean the tip off the nozzle before you drop the nozzle onto your gauge - it can make a difference.) You're shooting for a Z-Offset value in the range of 0.05 plus or minus a bit. (Also, don't forget to change the Z-Offset value to zero when you print your calibration squares, or you'll crash the nozzle after you re-set that bolt.)

So, that is what he is suggesting, and he is right, it will result in fewer problems for you down the road. You said you had set the Z-Stop eight times in the last couple of weeks - if you didn't change the height of the bolt before you did those, it didn't do you a bit of good.....your bolt is set too high.

(You can correct this using the old style method to set your Z-Stop. The first one in the Beginner's Guide that the V3B users had to use. It will give you better results.)

I didn't want to suggest that until after you finished your fob prints, and tried to work around the problem with the Z-Offset settings, but you will eventually need to do it. In the meantime, you can add a Retraction Vertical Lift of about 0.4 mm to your slicer settings to cause the machine to jump when it retracts. That might keep it from whacking the print now.

I hope that helped to explain things somewhat....I've got to get cracking on other things. Oh....check the guide out below - it gives some great S3D fixes for common problems:

https://www.simplify3d.com/support/prin ... eshooting/

:D

User avatar
ednisley
Posts: 1188
Joined: Fri Apr 11, 2014 5:34 pm
Location: Halfway up the Hudson
Contact:

Re: Z-stop light still on at layer 3

Post by ednisley » Thu Mar 31, 2016 6:40 pm

dramsey wrote:Why is the light still on?
Because the switch has some overtravel (*): the switch trips with the platform at a specific point, but "un-trips" only after the platform moves a fair distance in the other direction.

My switch is not your switch, but it has 0.3 mm of overtravel. This picture shows the situation before I built a new bracket to reduce the distance:
http://softsolder.com/2015/03/10/makerg ... is-switch/

Image
home Z when the print starts, then offset by -0.14mm
Remember that the Z offset doesn't move the platform, it just redefines the current position. So you're starting with the platform home position (where the switch trips) defined as Z=-0.14 (assuming I'm interpreting the sign correctly). The platform must then move +0.34 mm to reach Z=+0.20 for the first layer and 0.20 mm for each layer beyond that.

For that setup on my M2 and with the nozzle off the platform to the far right, the switch trips as the platform rises and, at that point, the Z Offset is -2.00: the platform is 2.00 mm above the nozzle. The platform must drop by 2.25 mm to reach Z=+0.25 for the first layer and the switch un-trips as the platform passes Z=-1.70 during that initial move.

Because I have the switch firmly bolted to the gantry, twiddling the Z Offset is the only way to change the platform position that corresponds to Z=0. On the other paw, not having to putz with the Z bolt makes up for it; I haven't changed the Z Offset in I-don't-know-how-long; it's that stable.

Although 0.75 mm of overtravel sounds a bit high, it is what it is. You can check the value by homing the printer, then jogging in 0.1 mm increments until the light goes off; I assume S3D allows you to do that.

Edit:
(*) The fancy term is "hysteresis", but ... I'd rather not have to explain why that word doesn't mean what you think it means. [grin]
https://en.wikipedia.org/wiki/Hysteresi ... ol_systems

User avatar
insta
Posts: 2007
Joined: Tue Sep 16, 2014 3:59 am

Re: Z-stop light still on at layer 3

Post by insta » Thu Mar 31, 2016 11:07 pm

Listen to Ed, for he is right again.
Custom 3D printing for you or your business -- quote [at] pingring.org

Post Reply