Just curious if anyone else has seen some of the general weirdness I've been seeing the last couple of days.
Had, yet another, extruder jam. So I cleared the jam, no problem. I had a spare nozzle, though to be fully "transparent", it was a used nozzle from a different but same rev. extruder (V4), and put that nozzle on the extruder that I cleaned up. Maybe all my issues can be traced to threading this used nozzle to a different extruder that it had spent most of its time on.
So in no particular order, here's my list of oddness:
1. The z-stop magically had changed after re-assembly. Its possible the nozzle is .16 mm taller than the one it replaced, but I was previously using a g-code z-offset in S3D to get my regulation 2 mm tall calibration square, but even after setting the z-offset to zero, post jam clearing, I was still .03 mm 'too tall.' This was after doing the same gap-setting method recommended for the V4 (ie. zero the bed, feeler gauge between nozzle and bed, tighten extruder clamp bolt).
2. Maybe there is operator error with my feeler gauges, but after my first extruder jam, the extruder was snug, but not loose, I home Z, with .15mm gauge between nozzle and bed, tightened the extruder clamp bolt, ran my calibration square, and was nearly .10mm too tall. After my most recent extruder jam, I compromised and used .10mm gauge, and "wait for it!" yup, was .05mm too tall on the first calibration square.
3. The used nozzle may have been damaged after the first jam. Though I did not use any mechanical methods to clearing the jam on the nozzle, e.g. solvents only. Running calibration squares, and doing the extrusion math, .40 mm/ 'measured mm' wall thickness * .90 yields extrusion multipliers that are .05 bigger than the number I enter in my S3D profile that gets me close. Its also possible that my set-up is in that weird place where it doesn't matter what my configuration is, I'm going to get .43 mm walls, but I have only two data points, so don't have definitive evidence.
I have a 100 hours +/- on my printer, so its not like I've been running the machine 24x7 for a year and all my components are worn and tired.
Z-stop and Extruder Gremlins

Re: Z-stop and Extruder Gremlins
Assuming you removed the V4 from the mount while changing the nozzle (which you should always do or you will eventually brake the barrel in half of the V4) the Z-height is always going to change when you reinstall it and it's going to need to be readjusted.
Even if you changed the nozzle with the V4 still mounted in the printer you are still probably going to have to re-calibrate the Z-height and off sets every time. Maybe your nozzle had a little crud or something in the threads and it doesn't screw on exactly as far as the other one. Either way the measurements that your taking about while they are so insignificantly small it doesn't take much to affect things like your first layer height, ect. It's just one of those things your just going to have to get use to setting if you make changes like that.
Even if you changed the nozzle with the V4 still mounted in the printer you are still probably going to have to re-calibrate the Z-height and off sets every time. Maybe your nozzle had a little crud or something in the threads and it doesn't screw on exactly as far as the other one. Either way the measurements that your taking about while they are so insignificantly small it doesn't take much to affect things like your first layer height, ect. It's just one of those things your just going to have to get use to setting if you make changes like that.
____________________________________________________
See my projects at https://www.theneverendingprojectslist.com
See my projects at https://www.theneverendingprojectslist.com

Re: Z-stop and Extruder Gremlins
Keep this picture in mind:ajmadison wrote:The z-stop magically had changed after re-assembly
https://softsolder.com/2015/11/12/3d-pr ... alization/
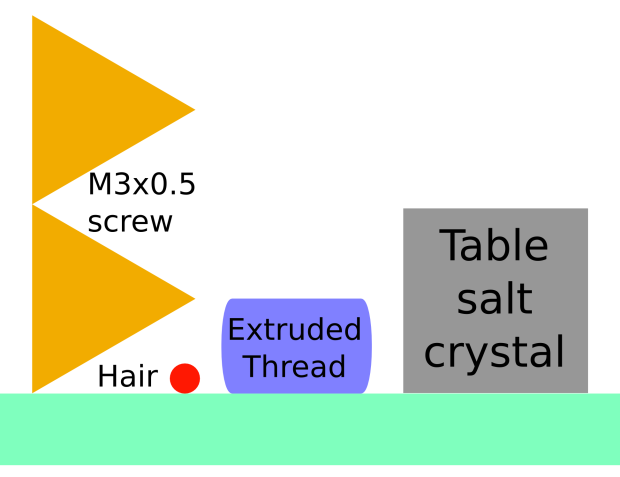
The plastic thread is 0.25 mm tall and a human hair is maybe 0.05 mm.
The nozzle-to-platform distance is so small and so critical that changing anything affects it: there's no way to make any mechanical adjustment to the printer without changing the gap enough to mess up all subsequent results.
Basically, any time you change anything, even removing and replacing the same nozzle, you must adjust the Z offset from first principles. My old M2 don't have all the fancy new features & apps & suchlike, so I just measure the height of a hollow square and adjust the Z offset in my startup G-Code; no big deal, takes a few minutes overall, and doesn't happen more than a few times a year (mostly because I run filament spools until they're empty).
Opinion: the feeler gauge process gets you close, but the only thing that matters is the actual height of a test piece. Measure that, tweak the offset, verify the result, and move on.
Hard to believe, but true!