Greetings!
I received my MakerGear M2 printer towards the end of last week. It ran out of the box (though I did have to adjust the Z-Axis home point), and I successfully printed a model I downloaded from the web (a thing which looks like a pump impeller). I therefore conclude that the printer and Creator software are working perfectly.
I them downloaded 3D SketchUp Maker and created my own "first model" - an HO scale drain pipe scupper for a building I am constructing for my HO scale train layout. The scupper is small - roughly 0.08W x 0.08H x 0.10L. I exported the model from SketchUp to an STL file and loaded it into Creator - where it didn't show up on the screen. When I tried to print it, that didn't work either. The printer seemingly tried to lay down two layers of a rectangle, but even that didn't print.
I have attached the .skp and .stl files to this post. Hopefully someone can take a look and tell me what I did wrong.
Thanks very much in advance!
Edit - not sure the attached files came through, though it was indicated that they uploaded ok.
First Self-Created Model Won't Print
-
Dwight Ennis
- Posts: 3
- Joined: Fri Dec 05, 2014 2:37 am
First Self-Created Model Won't Print
Last edited by Dwight Ennis on Sat Dec 06, 2014 2:18 am, edited 1 time in total.

Re: First Self-Created Model Won't Print
no files were attached. not saying this is the cause but sketchup is terrible for making models for 3d printing. sketchup is a surface modeler not a solid modeler. its very poor at exporting watertight models which are needed. if its not watertight then it can really confuse the slicer and it wont know what to do with it. download netfabb basic and do an analysis. see what shows up.
Re: First Self-Created Model Won't Print
You can also try running it through netfabb's cloud service (https://netfabb.azurewebsites.net) to clean it up. As Jim says, Sketchup is notoriously awful for creating models for 3D printing. Although a lot of people have used it successfully to do great things, they're doing those things in spite of Sketchup.
What happens when you load it into Simplify3D? Does the model appear in the models list in the upper left? Your units are in inches, I take it. At that size, Simplify3D should detect that it is teeny and automatically offer to convert units for you. If you do not say yes, it will assume your model is in mm, and it would be invisibly small.
Uploading non-image files to this forum is tricky. Zip up the files first, that will work.

Re: First Self-Created Model Won't Print
There's probably a unit mismatch: although you're working in inches, the STL file doesn't carry the units along. The rest of the software interprets "1 unit" in the STL file as "1 mm", so your model just shrank by a factor of 25.4. If you build models with millimeter dimensions, that problem will Go Away, otherwise, you must scale everything up by a factor of 25.4.The scupper is small - roughly 0.08W x 0.08H x 0.10L
However, even after you sort that out, you have an extremely small model: it's 2x2.5 mm in the XY plane and 2 mm tall. The extruded plastic thread is about 0.4 mm wide and 0.2 mm tall, so the model will have only 5x6 threads in XY and 10 in Z. That's not much material at all.
While it's possible to build something that small, all the limitations of 3D printing will be in your face right from the start. If you were thinking of printing something larger later on, I highly recommend you start with that, then come back to this one. [grin]
Things to look out for:
- The smallest XY feature must be two threads wide, about 0.8 mm
- Tiny objects become molten blobs: slow down or print many copies
- First layer thickness: platform alignment becomes critical
- Platform adhesion: use hair spray or glue stick
The narrow section is 2.5 mm wide and the opening is 2.45 mm:
http://softsolder.com/2011/05/27/thing- ... erfection/
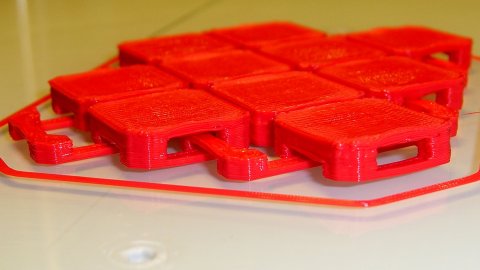
The link bars are 2.4 mm wide and 0.8 mm thick:
http://softsolder.com/2014/12/04/3d-pri ... y-edition/
A small bracket with tiny features:
http://softsolder.com/2014/11/03/kenmor ... on-sensor/

Cable clips with miniature posts:
http://softsolder.com/2014/10/06/kenmor ... ble-clips/

Poke around in past messages to find a wealth of good advice, plus commentary on what doesn't work; you'll save time and reduce aggravation.
Welcome aboard...
-
Dwight Ennis
- Posts: 3
- Joined: Fri Dec 05, 2014 2:37 am
Re: First Self-Created Model Won't Print
Thanks for the replies. Sure enough, I was saying "No" when Creator asked me whether or not to convert to mm. Once I started again, reimported, and said "Yes" the scupper showed up on the creator bed image. I also ran the file through the netfabb service prior to trying again (thanks so much for that link).
I tried printing one scupper on blue masking tape, which is what I had on the bed when I calibrated the Z-axis with a business card (as shown in the Youtube video by MakerGear). I got something slightly recognizable. As you said, maybe I need to slow things down. Further attempts to print directly on the glass bed didn't work, but then again, that's not what I calibrated for.
I'll keep playing and trying different things, and will report back. Thanks so much for all the help.
Re: First Self-Created Model Won't Print
I agree with Ed on nearly everything but his thoughts about the minimum thickness. I print things all the time at one extrusion width, say around .4 for the .35 nozzle. I would not recommend it for a first print though.
I will add that I think there is a limit with slowing down a print for smaller pieces. When the printhead is working a part slowly then the heat from the hotend just has more time to soak into the part. It is far better to manage this by printing multiple items spaced farther apart or as Jim was suggesting the other day to put your skirt layers at 9999 which will make it print a skirt the full height of the model. Just offset the skirt out further for more time between layers.
Oh and another tip about modeling your own stuff. Make sure you have a flat bottom on the model somewhere that will give you a good bond to the bed. The smaller the part the more you have to worry about the amount of good contact area you will have to keep the part in place. The same is true for taller parts.
Erik
-
Dwight Ennis
- Posts: 3
- Joined: Fri Dec 05, 2014 2:37 am
Re: First Self-Created Model Won't Print
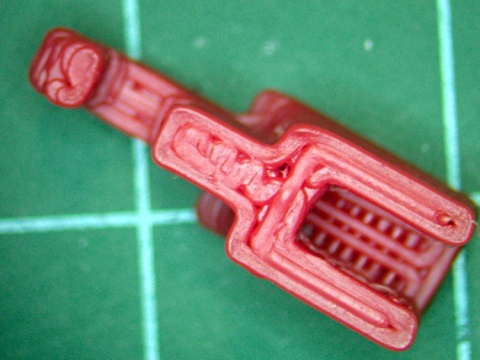
Again, thanks to all for the helpful info and advice. Since I can't seem to upload the actual model file, I made a simple JPG so all can see what I'm trying to make. The scupper is, as I said, 0.080 x 0.080 at the top, and tapers to 0.070 x 0.070 at the bottom, and is 0.100 long. The hole in the bottom is 0.062 diameter, and is where the drain pipe attaches (made from 0.062 diameter styrene rod). The backside upon which the scupper lays during building is flat and perpendicular to the top and bottom surfaces.
- Attachments
-
- Scupper.jpg (238.8 KiB) Viewed 12859 times
Re: First Self-Created Model Won't Print
(0.07 in - 0.062 in) * 25.4 mm/in = ~ 0.2mm. The thinnest parts of the wall are too thin to print with a 0.4mm thread thickness. You will need to increase all exterior dimensions by 0.2mm at the least.
Re: First Self-Created Model Won't Print
The geometry will prevent the top from filling completely: the acute angles where the perimeters neck down to a single thread width (that's after enlarging the dimensions) won't allow solid fill, because the angle will be narrower than a single thread width.jsc wrote:increase all exterior dimensions by 0.2mm at the least.
Also, if you want the hole to fit a rod, then you must slightly oversize the hole to ensure it'll actually come out right.
I did a quick OpenSCAD model and the box disappears around the hole, leaving a single, round-ish perimeter thread. The slightly larger base consists of two nested squares, plus an infill dot.
It's simply too small to produce with a fused-filament printer.
Code: Select all
// Tiny scupper testcase
//	Ed Nisley KE4ZNU - Dec 2014

//------
// Extrusion parameters

ThreadWidth = 0.4;
ThreadThick = 0.2;

HoleWindage = 0.2;

function IntegerMultiple(Size,Unit) = Unit * ceil(Size / Unit);

Protrusion = 0.1;			// make holes end cleanly

//------
// Model dimensions

BlockBase = 0.080 * 25.4;
BlockTop = 0.070 * 25.4;
BlockHeight = 0.100 * 25.4;

PipeOD = 0.0625 * 25.4;
PipeSides = 8;
PipeOffset = 4 * ThreadThick;

TrimAngle = atan(BlockHeight/((BlockBase - BlockTop)/2));
echo(str("Trim Angle: ",TrimAngle));

//-------
// Shape small holes for proper final dimension

module PolyCyl(Dia,Height,ForceSides=0) {			// based on nophead's polyholes

  Sides = (ForceSides != 0) ? ForceSides : (ceil(Dia) + 2);

  FixDia = Dia / cos(180/Sides);

  cylinder(r=(FixDia + HoleWindage)/2,
           h=Height,
	   $fn=Sides);
}

//-------

difference() {
	translate([0,0,BlockHeight/2])			// basic block shape
		cube([BlockBase,BlockBase,BlockHeight],center=true);

	translate([0,0,PipeOffset])			// cylinder
		rotate(180/8)
			cylinder(d=PipeOD,h=BlockHeight,$fn=PipeSides);
//			PolyCyl(PipeOD,BlockHeight,PipeSides);

	for (a=[0:90:270]) {					// slanted sides
		rotate(a)
			translate([BlockBase/2,0,0])
				rotate([0,TrimAngle-90,0])
					translate([BlockBase,0,BlockHeight])
						cube(2*[BlockBase,BlockBase,BlockHeight],center=true);
	}
}