normal for surface with supports?

Need some assistance getting started...post here...
98LT1
Posts: 3
Joined: Wed Jun 03, 2015 6:56 pm

normal for surface with supports?

Post by 98LT1 » Tue Jun 09, 2015 7:50 pm

Hello!

I just got a M2 with the V3B (with I knew the 4 was out before I ordered) and have started making all the parts that I have always said I wish I could make.

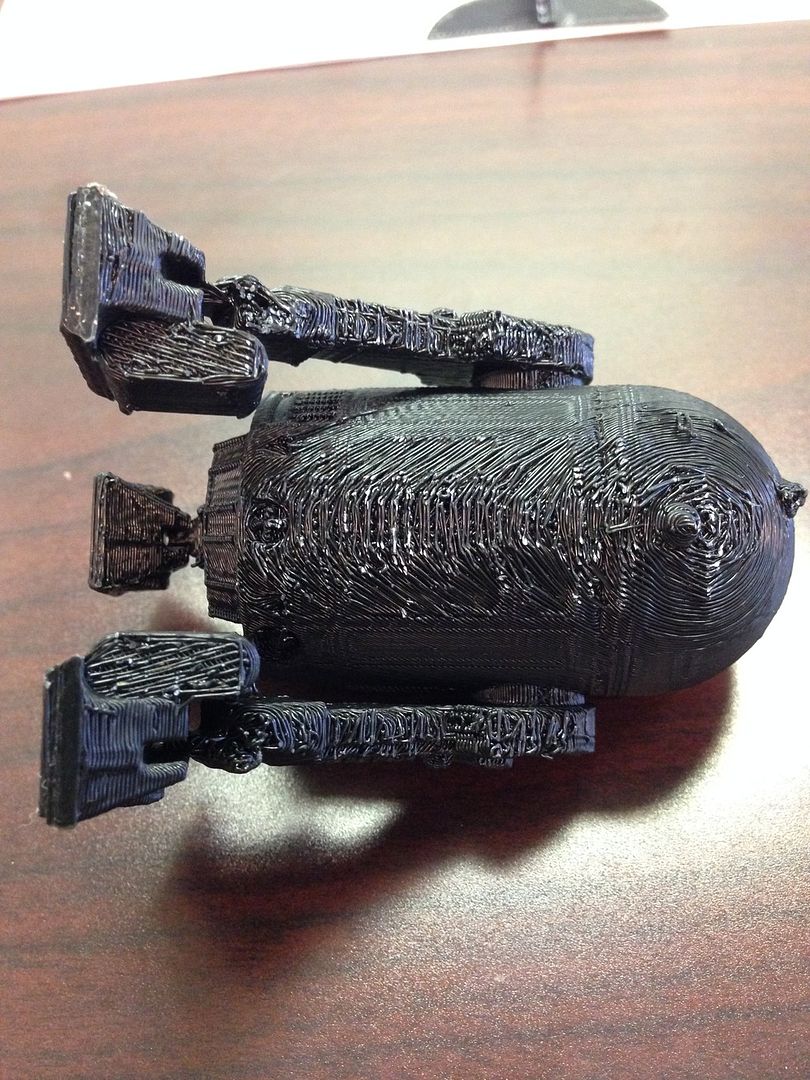
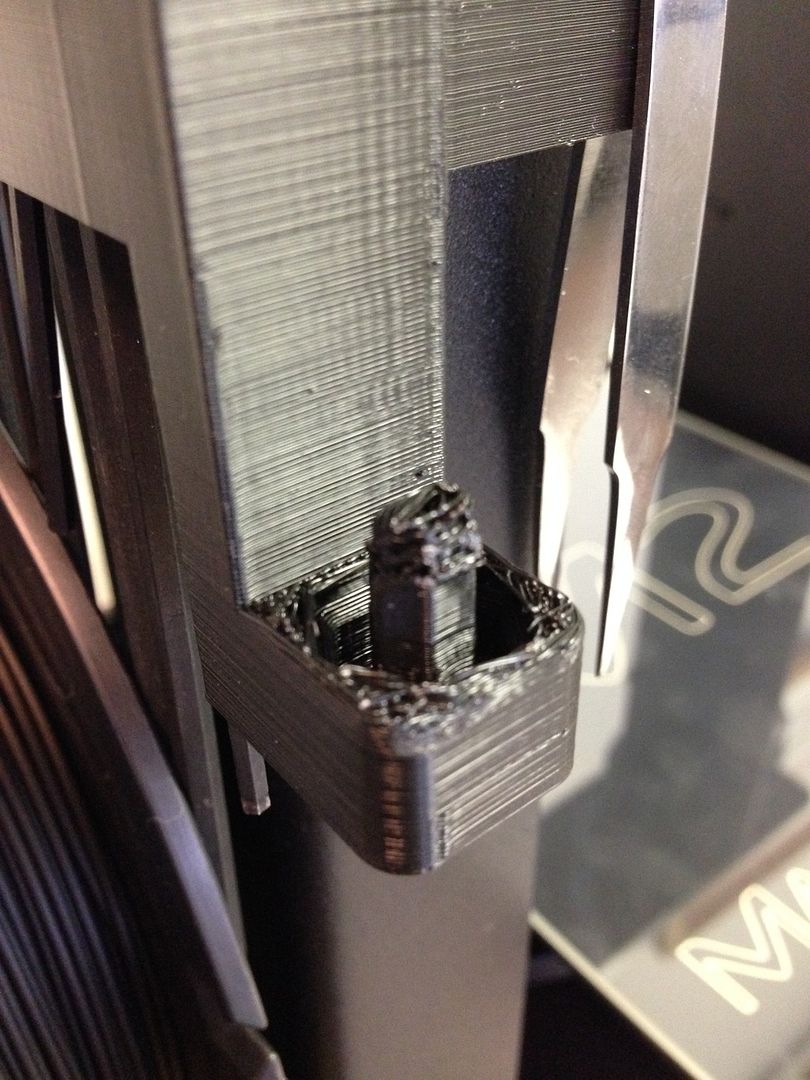
I am using S3D with the latest updates, the machine is working great I have followed the instructions for calibrating the width and the Z axis and that is going fine. My only concern is how surfaces come out when they have to use the support material. If the surface actually forms correctly the surface is very rough and jumbled compared to the rest of the part. Is this normal?

this was the bottom of the print that rested on supports
Image

I printed this parts upside down but the supports didnt work very well
Image

So is this normal?
are there any setting I should be looking at to adjust the outcome in these areas?

User avatar
Jules
Posts: 3144
Joined: Wed Jan 21, 2015 1:36 am

Re: normal for surface with supports?

Post by Jules » Tue Jun 09, 2015 8:28 pm

Yeah, totally normal, unfortunately. When you are essentially "printing over thin air" with overhangs that don't have two completely even ledges that the machine can bridge across, you can see that.

(My first half dozen prints of that tool holder looked just like that. It's a difficult print, because the support material that is necessary to keep the bottom from looking too loopy, is impossible to remove from those tight spaces.)

For that particular print, flip it over.
You'll get no looping on the post area, which is what winds up on top when you install it, and it's a lot easier to remove support from the other flat side, which ultimately winds up on the bottom anyway, and can't be seen. You can just sand it down if there are bad areas.

If you use support, there is generally less of that loopy effect, but it can be tedious to remove. You'll get the best support for it by making sure that the Bottom and Top Layer Separation in the Support Tab is set to zero, but it's still going to have some nubs, and it's a lot harder to separate from the print, so it's basically a balancing act.

The best thing to do is look at each design in terms of "How can i get the best print on this shape?" and then orient it in S3D to create the least work for yourself. Rounded areas of overhang are impossible to get a perfect print, even with support.

That R2D2, for instance, is never going to print without looping unless you stand it up on it's legs, (pods, whatever the heck you call those things.....). After, you'll have to remove the support out from underneath and probably do some sanding, but you'll get a great finish on the body of the print, and it will need less support.

Hope that helped - unfortunately there isn't any other way to do it if you don't cut it into parts and have one flat side down. (Had to do that on a few prints too.) :roll:

Bratag
Posts: 438
Joined: Wed Jan 14, 2015 5:33 am

Re: normal for surface with supports?

Post by Bratag » Tue Jun 09, 2015 8:48 pm

You can reduce the roughness of the surface in contact with the support by turning on dense support as well. Rsilvers support settings are a good place to start but I generally print with less of a gap between support and part than his profiles. It means a less looping etc on the part in contact with the support, but the trade off is it can sometimes be hard to remove the supports. An added bonus of using dense support is you can use a low support % all the way up and only the last x number of layers use a lot of filament.

98LT1
Posts: 3
Joined: Wed Jun 03, 2015 6:56 pm

Re: normal for surface with supports?

Post by 98LT1 » Tue Jun 09, 2015 9:12 pm

Thanks Jules for the feedback and the thought process. I have started to redesign some parts around the support system and just wanted to make sure the results were typical and not due to bad settings.
Bratag wrote:You can reduce the roughness of the surface in contact with the support by turning on dense support as well. Rsilvers support settings are a good place to start but I generally print with less of a gap between support and part than his profiles. It means a less looping etc on the part in contact with the support, but the trade off is it can sometimes be hard to remove the supports. An added bonus of using dense support is you can use a low support % all the way up and only the last x number of layers use a lot of filament.
Where would i find "Rsilvers" support settings?

and thanks for the input

Bratag
Posts: 438
Joined: Wed Jan 14, 2015 5:33 am

Re: normal for surface with supports?

Post by Bratag » Tue Jun 09, 2015 9:31 pm

http://www.thingiverse.com/thing:269637

Keep in mind those profiles are for the E3d not the V3b but the support settings etc should be fine to take from it.

User avatar
jimc
Posts: 2888
Joined: Wed Apr 09, 2014 11:30 pm
Location: mullica, nj
Contact:

Re: normal for surface with supports?

Post by jimc » Tue Jun 09, 2015 9:42 pm

the best thing you can do for clean prints is design you model in pieces so it can be printed in parts that dont need support then assemble or glue together when your done. the r2d2 for instance could be split down the middle of the body and both halves printed down. support is a pia. sometime there is no way around it but if you are making your own models just keep that in mind. not all models need to be printed as a complete piece. ill take a model and split it up into 20 pieces if i thought it would print easier and i could get away with no support. here is great example i am setting up to print right now. this is a U shaped tube for my wet/dry vac to suck out my gutters. i split it into 3 pieces with a small flange. i can solvent bond it together when its done and all i need is that tiny bit of support for the flange on the one tube.
Screen Shot 2015-06-09 at 4.44.55 PM.png
Screen Shot 2015-06-09 at 4.44.55 PM.png (203.83 KiB) Viewed 10864 times
Last edited by jimc on Tue Jun 09, 2015 9:47 pm, edited 1 time in total.

jsc
Posts: 1864
Joined: Thu Apr 10, 2014 4:00 am

Re: normal for surface with supports?

Post by jsc » Tue Jun 09, 2015 9:47 pm

If you want to reduce support on difficult parts, one of the best ways is to split the print into parts such that support is minimized, then glue everything back together. For the R2 unit, I would try splitting it down the middle front to back. You can do this in Simplify3D by duplicating your model, then flipping one copy upside down and dropping them both partly under the bed by half their z-height.

User avatar
jimc
Posts: 2888
Joined: Wed Apr 09, 2014 11:30 pm
Location: mullica, nj
Contact:

Re: normal for surface with supports?

Post by jimc » Tue Jun 09, 2015 9:48 pm

the force must be strong with you!

Bratag
Posts: 438
Joined: Wed Jan 14, 2015 5:33 am

Re: normal for surface with supports?

Post by Bratag » Tue Jun 09, 2015 10:03 pm

jsc wrote:If you want to reduce support on difficult parts, one of the best ways is to split the print into parts such that support is minimized, then glue everything back together. For the R2 unit, I would try splitting it down the middle front to back. You can do this in Simplify3D by duplicating your model, then flipping one copy upside down and dropping them both partly under the bed by half their z-height.
Wow I never even though about doing it this way. I always bust out meshmixer or something and do it that way... genius

User avatar
Jules
Posts: 3144
Joined: Wed Jan 21, 2015 1:36 am

Re: normal for surface with supports?

Post by Jules » Tue Jun 09, 2015 10:08 pm

jsc wrote:If you want to reduce support on difficult parts, one of the best ways is to split the print into parts such that support is minimized, then glue everything back together. For the R2 unit, I would try splitting it down the middle front to back. You can do this in Simplify3D by duplicating your model, then flipping one copy upside down and dropping them both partly under the bed by half their z-height.
YOU MEAN I DO NOT HAVE TO WRESTLE WITH CUTTING PLANES?!!!? :shock: (Frickin-frackin-mumble-gorble-dee-doodie-wonk!)

Post Reply