Have questions or comments about Simplify3D, Slic3r, Cura, Reptier, etc? Or wondering about which CAD software to use...discuss it here...
-
pyronaught
- Posts: 684
- Joined: Mon Dec 01, 2014 8:24 pm
Post
by pyronaught » Wed Jan 14, 2015 6:48 am
Apparently this is problem that many people using Simplify 3D run into-- which is either warts where the extruder reverses direction when using random start points for the layers, or seams where all the warts are aligned in a row when having the software auto select the start point for optimum speed (which usually has them all located in the same spot on each layer). This one I know should be possible to fix, but damned if I can figure it out. I've played with coasting and wipe distances all day and none of the settings seem to have any effect. Even really big coasting distances like 1.8 mm looks just the same as .7mm. The gaps in the Simplify 3D preview get longer as coasting distances increase, but the warts don't diminish any. I can line up all the warts into a single seam by turning off the randomize feature, or I can disperse them all over the model but just can't get rid of them.
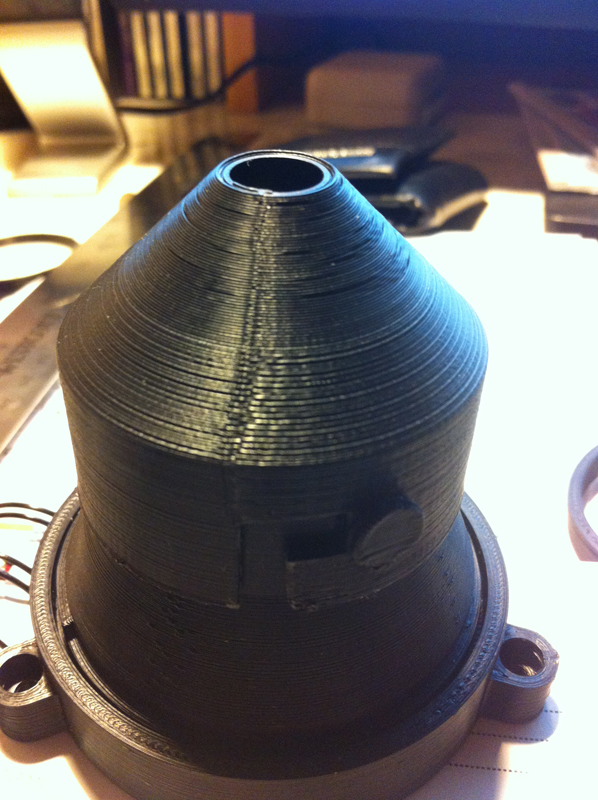
Here's a seam example and a warts example image, along with a print preview showing the gaps where the coasting transitions occur. If I print the orange model and let the software auto-choose the reversal points, it hides all the warts in a crevice and it looks clean. Don't want to rely on that kind of luck though. These are both ABS at 245/90 for the temps
- seam.jpg (377.63 KiB) Viewed 16934 times

- warts.jpg (313.52 KiB) Viewed 16934 times

- model.jpg (854.42 KiB) Viewed 16934 times
Experience is what you get when you didn't get what you wanted.
-
jsc
- Posts: 1864
- Joined: Thu Apr 10, 2014 4:00 am
Post
by jsc » Wed Jan 14, 2015 7:10 am
Some suggestions:
Do you have retraction vertical lift on? Try turning it off.
One other setting you can play with is Extra Restart Distance. If you see that the blobs are occurring when the line starts and not at the end, you can set a small negative extra restart distance (-.1, -.2) and see if it makes any difference.
What speeds are you printing at?
Is your filament dry? How long has it been since you opened it/removed it from dry storage?
Finally, under the Layer tab, you can choose your own layer start point to collect the seams into an inconspicuous corner, if your model has one. To get an accurate coordinate, you can use the trick of dropping in a very skinny cylinder, manually positioning it, and reading off the coordinates in the details window you get when you double click it.
-
jimc
- Posts: 2888
- Joined: Wed Apr 09, 2014 11:30 pm
- Location: mullica, nj
-
Contact:
Post
by jimc » Wed Jan 14, 2015 2:38 pm
Jin pretty much covered all the bases. In most of the cases the blobs are at the beginning of the line after a rapid jump. Its just what oozes out of the nozzle during the jump. The higher the moisutre in the filament the harder it will be to control this. If its real damp it may be impossible. 1.8 on the coast with a v3b hot end isnt really big. 1.8-2.4 i would consider that normal range for abs. Retraction around 1.8 and i would always start with a neg restart distance of -.05 then slowly work up from there. Keep that and coasting as small as possible to get decent results. Keep the wipe feature on default 5mm always. Remember coast stops pushing filament before the end of a line to relieve pressure, kinda like hitting the release button on a caulking gun. The neg restart will start the line without pushing filament for x amt of distance. Too big a value on either one of these and you have a gap. Too small a value and you have a bulge or blob. I always prefer to make a seam rather than scattering then across the model.
-
Tim
- Posts: 1205
- Joined: Thu Apr 10, 2014 2:19 pm
- Location: Poolesville, Maryland
-
Contact:
Post
by Tim » Wed Jan 14, 2015 5:15 pm
The S3D tool path view shows the gaps where the settings are allowing for extra filament coming out of the extruder---S3D is drawing the gaps but, in effect, is expecting them to be filled. Clearly, the warts line up exactly with those gaps, and show that not only were those gaps filled up by the excess filament coming out after the extrusion stopped, but there was plenty extra coming out to start spilling out over the sides. As long as everything is moving and extruding, the flow of filament is precisely controlled and behaves in a predictable manner. Unfortunately, as soon as the extruder motor stops, a lot of random factors suddenly come into play, as there is still pressure in the nozzle. The pressure will keep the filament flowing out; retraction will stop it, eventually, by relieving the pressure. Meanwhile, the amount of filament still coming out of the nozzle depends on heat, moisture, atmospheric conditions, who knows what.
You can try some of the selections under the "Advanced" tab in S3D in the "Ooze Control Behavior" box. Most of the options seem to be attempts to avoid stopping the extruder, and so may be relevant. Some of them are definitely on the mysterious side. "Extruder ooze rate" says that it is an "Experimental feature to counter extruders with fairly constant oozing" but doesn't say much about what it actually does.
General question: Is there anybody who can describe what the various check boxes in "Ooze Control Behavior" do?
-
pyronaught
- Posts: 684
- Joined: Mon Dec 01, 2014 8:24 pm
Post
by pyronaught » Wed Jan 14, 2015 5:35 pm
The filament just came out of a vacuum sealed bag and humidity is currently 43%, so I really don't suspect moisture being an issue. I was actually trying to tweak the settings far enough to cause holes in the model instead of blobs just to find the working range between blob and hole, but can't seem to get that to happen. I've had holes in the past using smaller coast settings, so something else must be interfering. I do have "only retract when crossing open spaces" turned on in the ooze control settings, so there is no retraction happening on the reversals where these blobs are being created. Maybe I'll try turning that off next. Restart distance is set to zero too, so there's another thing to try.
I notice on the cone in the first image that the blob size shrinks as it progresses up the cone layers. Since the print speed diminishes as the diameter of each cone layer shrinks, the blob size can be seen to be effected by print speed. Slower speed produces smaller blobs. My default print speed is 4500, rapids is 9000 and outline underspeed is 50%. That underspeed setting is not clear... is that 50% of full speed or is that a 50% reduction in speed? Of course at 50% it's the same either way, but for changing it to some other value it would be good to know.
Experience is what you get when you didn't get what you wanted.
-
jimc
- Posts: 2888
- Joined: Wed Apr 09, 2014 11:30 pm
- Location: mullica, nj
-
Contact:
Post
by jimc » Wed Jan 14, 2015 5:49 pm
50% perimeter speed is 50% of your regular print speed of 4500. the blobs are getting less as it goes up the cone because if its printing slower and slower then the pressure in the nozzle will be less and less. so with less pressure to relieve you will get a smaller zit. the boxes that should be checked in the ooze control section is force retraction between layers and only wipe for outer most perimeter. the open spaces should be unchecked. if its not retracting from that being checked then that will compound the problem and make everything hard to tune since you leaving everything pressurized. as for the filament, you would be surprised. even in a vacuum sealed bag it can be a problem. i saw a video recently of a place in china extruding 3d printer filament and after its extruded it goes in a water tank about 150 ft long to cool before it gets winded wet onto a big massive spool.

tim...the ooze rate control, i messed with that a long time ago when it was first introduced and we were just starting to play with pet+. all it seemed to do was reduce the amount of filament extruded. just like turning down the multiplier. when 2.0 was released someone posted on the s3d forum that they sliced the same model twice. one with it on and the other with it off and there was no difference in the gcode. it definitely used to do something so im not sure if that was disabled or what the deal was
-
pyronaught
- Posts: 684
- Joined: Mon Dec 01, 2014 8:24 pm
Post
by pyronaught » Wed Jan 14, 2015 6:10 pm
Turns out it was the "only retract when crossing open spaces" setting being checked in ooze control that was causing the problem. When that is checked, the coast and wipe settings have no effect on direction changes within the same layer. Now I'm getting gaps with the 1.8mm coast and can back it off a bit.
You can really burn up some serious time dinking with these settings!
Experience is what you get when you didn't get what you wanted.
-
jimc
- Posts: 2888
- Joined: Wed Apr 09, 2014 11:30 pm
- Location: mullica, nj
-
Contact:
Post
by jimc » Thu Jan 15, 2015 12:35 am
haha listen, i have had my m2 for a year and a half. i usually am printing something every day and i still dink with settings. only difference is i can dink with them a little faster and know which ones to dink with......usually lol. its all part of it. the more familiar you get with how s3d works the more 2nd nature it will become. it can be real time consuming though in the beginning. try to not jump around to different slicers. try and master one. you'll be better off in the long run.
-
pyronaught
- Posts: 684
- Joined: Mon Dec 01, 2014 8:24 pm
Post
by pyronaught » Thu Jan 15, 2015 2:01 am
I have to laugh anytime I hear someone talk about a consumer FFF type 3D printer being "plug and play" or "turn key" in the sense that someone can just buy one, plug it in and start printing things without any knowledge. The Cube printers seem to be pretty bent on advertising their printers this way. All they really did was remove all the detailed settings from their software to make it seem simpler, but then you are stuck with what it prints since there is no way to fine tune it. I just don't see this form of FFF type 3D printing ever being plug and play the way a 2D printer is. Maybe some other 3D printing technology in the future will be, but not this one. These printers are about in the same complexity class as a CNC router. It's just not the kind of tool that the average person can effectively use without putting in a lot of hours learning how to do it.
Experience is what you get when you didn't get what you wanted.
-
jimc
- Posts: 2888
- Joined: Wed Apr 09, 2014 11:30 pm
- Location: mullica, nj
-
Contact:
Post
by jimc » Thu Jan 15, 2015 2:03 am
totally agree


