Setting the tension screw on the filament drive can be a bit tricky. You want the tension to be firm enough to just catch the filament and guide it through, without smashing it in any way, since that causes problems with jamming and stripping the filament.
The tension screw should never be cranked so tightly that the two vertical uprights touch - there is supposed to be a fairly even gap between those uprights of approximately 1.5 - 2.5 mm. That's just an estimate, you can't really measure it precisely, and you can't set the tension by measuring the gap. It's going to change slightly for different kinds of filament.
What you can do, is have a bit of fun playing Sherlock (
Since a picture is worth a thousand words:
- Filament Drive Screw Tension.jpg (707.05 KiB) Viewed 44378 times
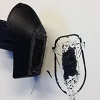
This is what you are shooting for. These are PLA, but you want about the same "bite marks" on whatever filament you are printing. That's going to mean adjusting the tension when you switch from one kind of filament to another, PLA to PETG for example, or any of the softer filaments. (And even though it doesn't necessarily belong here - remember that the softer the filament, the slower you print/extrude it.)
- This is what you are shooting for.
- Filament Ends.jpg (228.2 KiB) Viewed 44378 times
Tip Update: I jump back and forth between PLA and PETG on a regular basis, and i was getting a little tired of having to adjust that tension screw. Sometimes i'd completely miss the mark and wind up having to go through several iterations to get it reset correctly. One of the guys had mentioned making a mark on the bearing to see if it was turning on another post, and I decided to put that idea to use for the tension screw as well. It's a tremendous time saver......
Once you have the tension set correctly for a particular filament, make a mark on the 12:00 position of the screw. For mine, PLA is marked in black Sharpie marker (not very neatly, but i'll fix it later). So anytime i'm printing PLA, i make sure that the black mark is in the vertical position on the screw.
PETG is marked on my screw in red Sharpie, so when i print PETG, i make sure the red mark is up at the top.
That's it, and it's super easy. Notice how close together the two marks are - you don't have to tighten things up much when you switch to a different filament. But that tiny bit of turning can make all the difference.