Sure tim, i think the best thing i can do is post my config file. that would explain everything.
in short i am using the same pin for both the z endstop and the bed leveling.
I talked to Arthur Wolf via IRC before doing this to see if it would work. and if there might be any side effects to this. his response to me is that it should, but it was not designed to work that way. and as long as your not using the pin for both at the same time (which is basically not possible) it should work
He didn't indicate that they wouldn't support it, just that it was not a deign feature, so there was no efforts in making sure it could be used in this way. I'll post my config sometime today when i get a chance to pull it
M2 Auto-Leveling
Re: M2 Auto-Leveling
M2 - MKS SBase w Smoothieware, GLCD, 24v, Upg Z & extruder stepper - IR bed leveling, Astrosyn dampers X/Y/Z, MIC 6, Zebra, PEI, & glass Build Plates - E3D, V3B Hotends, & more - many other 3d printers - production printing.
Re: M2 Auto-Leveling
Hi guys. I'm interested in doing my own auto bed levelling experiments but I'm a real novice. I was hoping I could get some help here.
So here goes.
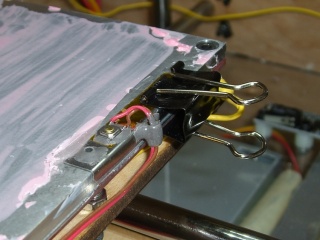
My plan is to follow lulzbot mini's strategy of having metal contact points at the corners of the print bed. They will be part of some type of clamping system I'm still thinking about. The metal contact points will be wired to the rambo and the hot end will also be wired to the rambo and when the two touch, voila, closed circuit. The metal corner clamps will, hopefully, be the same thickness so the offset of the hot end height when it touches the metal corner clamps will be fixed.
Now, it becomes more fuzzy from here for me.
I now I need to edit the firmware. I've done a bit of arduino programming so I think I can handle that, my problem is I don't know which section to edit. Heck, I don't even know which firmware to download. My M2 is only a few months old and its 24v.
Is there some sore of tutorial website or something that I can visit that will teach me which sections in the firmware I can edit?
Thanks in advanced!
So here goes.
My plan is to follow lulzbot mini's strategy of having metal contact points at the corners of the print bed. They will be part of some type of clamping system I'm still thinking about. The metal contact points will be wired to the rambo and the hot end will also be wired to the rambo and when the two touch, voila, closed circuit. The metal corner clamps will, hopefully, be the same thickness so the offset of the hot end height when it touches the metal corner clamps will be fixed.
Now, it becomes more fuzzy from here for me.
I now I need to edit the firmware. I've done a bit of arduino programming so I think I can handle that, my problem is I don't know which section to edit. Heck, I don't even know which firmware to download. My M2 is only a few months old and its 24v.
Is there some sore of tutorial website or something that I can visit that will teach me which sections in the firmware I can edit?
Thanks in advanced!
3D printing enthusiast
Makergear M2
Makerbot Replicator 2, heavily modified
Robox, kickstarter version
Mojo
Makergear M2
Makerbot Replicator 2, heavily modified
Robox, kickstarter version
Mojo

Re: M2 Auto-Leveling
My advice ....while time consuming would be to grab the minis firmware and your m2s and compare the two .Look at the sections configuration H And configuration advanced especially. I have wanted to do this exact same thing with my machine but sadly my motherboards auto tramming is still not working to a usable point in my opinion. I need another m2 to run stock and use this one to tinker with.

Re: M2 Auto-Leveling
Except for the thin layer of plastic that forms a perfect insulator around the nozzle...eddyogi wrote:the hot end will also be wired to the rambo and when the two touch, voila, closed circuit
It will work almost perfectly almost every time, but a "no contact" failure means the firmware will drive the nozzle right through whatever's below it, applying the full force of the Z axis motor until it stalls. If nothing bends or breaks, that's a bonus.
Nobody likes separate switches, but separating the messy nozzle from the precision sensing is the only way to keep both of them working.
Small surface-mount switches with metal buttons exist and you could poke them with a hot nozzle, but it's tricky:
http://softsolder.com/2011/05/18/thing- ... ht-switch/
Re: M2 Auto-Leveling
The easy solution, which I already do for other reasons, is to modify your ending gcode to retract your filament out of the hot zone at print end. I do this to make filament swaps easier at my next print as well as making startup easier with no filament in the nozzle. I always preheat, then clean my nozzle by hand before running the print. So the whole probe process would be goo free until well after the probing process.
Re: M2 Auto-Leveling
Good point. I want to follow the mini's lead with retracting the filament and doing some sort of wipe procedure before the actual leveling event.ednisley wrote: Except for the thin layer of plastic that forms a perfect insulator around the nozzle...
The button option does sound interesting, but I think the nozzle still has to be cleaned because is there is dry filament it will chance the z height. So, I think, either way there has to be some sore of nozzle wipe. But the button option is definitely a good way to have a fail safe mechanism. Hmm... Something to definitely think about.
3D printing enthusiast
Makergear M2
Makerbot Replicator 2, heavily modified
Robox, kickstarter version
Mojo
Makergear M2
Makerbot Replicator 2, heavily modified
Robox, kickstarter version
Mojo
Re: M2 Auto-Leveling
That is exactly what I am thinking of doing.PcS wrote:The easy solution, which I already do for other reasons, is to modify your ending gcode to retract your filament out of the hot zone at print end. I do this to make filament swaps easier at my next print as well as making startup easier with no filament in the nozzle. I always preheat, then clean my nozzle by hand before running the print. So the whole probe process would be goo free until well after the probing process.
3D printing enthusiast
Makergear M2
Makerbot Replicator 2, heavily modified
Robox, kickstarter version
Mojo
Makergear M2
Makerbot Replicator 2, heavily modified
Robox, kickstarter version
Mojo
Re: M2 Auto-Leveling
I have downloaded a firmware for the M2 from makergear's github. (I should have read the first few pages of this thread more diligently.PcS wrote:My advice ....while time consuming would be to grab the minis firmware and your m2s and compare the two .Look at the sections configuration H And configuration advanced especially. I have wanted to do this exact same thing with my machine but sadly my motherboards auto tramming is still not working to a usable point in my opinion. I need another m2 to run stock and use this one to tinker with.
I've started looking into the code via Arduino. I have to really take the time to really study the code, my daytime work is seriously taking up too much of my time.
Anyway, I was just about to ask if the mini's firmware was the same marlin firmware because your idea actually dawned on me while I was looking at the M2 firmware. I will have to go searching for a downloadable copy of the mini's firmware, if and when I get some free time.
3D printing enthusiast
Makergear M2
Makerbot Replicator 2, heavily modified
Robox, kickstarter version
Mojo
Makergear M2
Makerbot Replicator 2, heavily modified
Robox, kickstarter version
Mojo
Re: M2 Auto-Leveling
So, OK, granted that I'm a buzzkill, but we're talking about a tube of molten plastic with a hole in the bottom. If retracting and wiping worked for more than a fraction of a second, we wouldn't have nearly so much trouble with those little zits scattered all over our plastic objects.PcS wrote:preheat, then clean my nozzle ... the whole probe process would be goo free until well after the probing process.
You must use a well-heated hot end to measure the structure at operating temperature, but that also means molten plastic will ooze out of the nozzle. Any plastic, even hot plastic, will insulate the nozzle from the other "switch" contact, at least once in a while, at exactly the wrong time.
Bottom line: using the nozzle as an electrical contact will work well enough (especially while testing it), but will fail often enough to drive you mad.

Re: M2 Auto-Leveling
counterpoint: have the start gcode heat the nozzle hot enough to make the plastic conductive again 
Custom 3D printing for you or your business -- quote [at] pingring.org