PEI Bed Surface

Re: PEI Bed Surface
I use the glass+3M+PEI sandwich, and hold the whole kaboodle to the heatspreader with binder clips. It's worked well. I'd definitely use the adhesive, you don't want a strongly-warping part to pick up the PEI from the bed.
Custom 3D printing for you or your business -- quote [at] pingring.org
-
pyronaught

- Posts: 684
- Joined: Mon Dec 01, 2014 8:24 pm
Re: PEI Bed Surface
The PEI sheets themselves also tend to have a warp to it, so you need the adhesive to pull it flat. I went with the .03" thick PEI using the reasoning that it will take less force to pull the warp out of a thinner sheet than it will a thicker sheet, so there is less pulling force on the adhesive with a thinner sheet.
For the adhesive I used the 3M 468MP 12x12 sheets sold on Amazon, which seems to be the standard that most people use for attaching the PEI to a glass plate. My assembly method was this:
1) clean glass with Windex, dry it
2) wipe glass with acetone, dry it
3) attach the 3M sheet to the glass first, starting at one end and using a credit card to squeegee it down as it goes on
4) trim excess adhesive around the edge of the glass with an xacto knife
5) make sure there are no bubbles, and pop any that do exist by puncturing them and pin or xacto tip and squeegee out the air
6) remove backer from the 3M sheet
7) remove protective film from PEI sheet and press it onto the adhesive starting at one end and bowing it so that it can be rolled on from one end to the other instead of dropping it on all at once.
8) score the back side with an xacto, using the glass as a guide. Make sure score lines run all the way to the edges
9) you will never be able to cut all the way through this ridiculously tough film with your knife no matter how many times you retrace your score lines. It's like trying to cut floor tile. It has to be snapped off, which takes quite a bit of effort. I scored both sides just to make sure the break doesn't take a random turn and stays on the line. Then flip it upside down onto the edge of a table with glass side up and bend the film down till it snaps off.
I find that ABS sticks very well at just 70C bed temp, and can be peeled off at temps in the 40s. It releases easier than kapton + abs slurry does when it's time to remove the part. The kapton+abs slurry method varies in how difficult the part is to remove because the thickness of your abs slurry build-up is a random factor. Thicker slurry layer or higher abs concentration means part gets harder to remove. With PEI it's going to be the same every time since there is no bed prep. So that fact plus no bed prep requirement and being a very tough surface that you are not going to accidentally ding up with tools makes PEI the best surface for printing in my opinion.
Experience is what you get when you didn't get what you wanted.
-
pyronaught
- Posts: 684
- Joined: Mon Dec 01, 2014 8:24 pm
Re: PEI Bed Surface
Well, I spoke too soon. I just tried a more warp prone print with a large surface area and the PEI failed to hold it down. There was substantial warping around the edges where it lifted off the plate. So back to kapton + abs slurry for me. The PEI worked good for my hydrogen generator frames so I'll keep the PEI plate around just for printing those.
Experience is what you get when you didn't get what you wanted.

Re: PEI Bed Surface
I lightly scuffed the PEI surface all the way to the edges with a Magic Eraser, (couple of times in the beginning), and followed with some 1000 grit sandpaper, and it now sticks all the way to the edges pretty well.pyronaught wrote:Well, I spoke too soon. I just tried a more warp prone print with a large surface area and the PEI failed to hold it down. There was substantial warping around the edges where it lifted off the plate. So back to kapton + abs slurry for me. The PEI worked good for my hydrogen generator frames so I'll keep the PEI plate around just for printing those.
I think the sheets are just a little too smooth out of the box.
Re: PEI Bed Surface
i am going to cut up my 1/4" peice of scrap 2300 pei this weekend...i think i can make two build plates out of it. I plan to use it like i do my mic6 or the zebra plate and clamp it right on the anodized aluminium.
it is a bit thicker then 1/4" maybe closer to .275 there is a rough side and a smooth side...and is very stiff. it is thick enough that i am a little worried how it will conduct heat... see how it goes.
it is a bit thicker then 1/4" maybe closer to .275 there is a rough side and a smooth side...and is very stiff. it is thick enough that i am a little worried how it will conduct heat... see how it goes.
M2 - MKS SBase w Smoothieware, GLCD, 24v, Upg Z & extruder stepper - IR bed leveling, Astrosyn dampers X/Y/Z, MIC 6, Zebra, PEI, & glass Build Plates - E3D, V3B Hotends, & more - many other 3d printers - production printing.
-
pyronaught
- Posts: 684
- Joined: Mon Dec 01, 2014 8:24 pm
Re: PEI Bed Surface
I did read about the sanding trick, I'll have to try that. Hopefully I don't wind up creating a home made version of BuildTak and permanently fuse my print to the surface to where nothing can get it off.
Looks like 1500 is the recommended grit for sanding PEI. That's some seriously fine sandpaper! I can only find up to 1200 grit in the local stores, but amazon has the 1500.
Looks like 1500 is the recommended grit for sanding PEI. That's some seriously fine sandpaper! I can only find up to 1200 grit in the local stores, but amazon has the 1500.
Experience is what you get when you didn't get what you wanted.
Re: PEI Bed Surface
You can probably find the 1000-1500 range at any Auto-Zone or PEP boys place. (Where i found it.) For smoothing the purrrfect finish on prized cars, doncha know. 
-
pyronaught
- Posts: 684
- Joined: Mon Dec 01, 2014 8:24 pm
Re: PEI Bed Surface
Jules wrote:You can probably find the 1000-1500 range at any Auto-Zone or PEP boys place. (Where i found it.) For smoothing the purrrfect finish on prized cars, doncha know.
I did check the autozone website but didn't see it listed. I can get 1200 at Lowes though.
Experience is what you get when you didn't get what you wanted.
Re: PEI Bed Surface
It's generally sold in the same aisle as the spray paints. I usually find it in a combo pack from 400-3000 grit.pyronaught wrote:Jules wrote:You can probably find the 1000-1500 range at any Auto-Zone or PEP boys place. (Where i found it.) For smoothing the purrrfect finish on prized cars, doncha know.
I did check the autozone website but didn't see it listed. I can get 1200 at Lowes though.
Custom 3D printing for you or your business -- quote [at] pingring.org
-
pyronaught
- Posts: 684
- Joined: Mon Dec 01, 2014 8:24 pm
Re: PEI Bed Surface
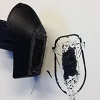
I sanded it with 1200 grit and it did improve the hold, but it still warped and the same corner pulled off the plate after about 3 hours into the job. The first time it warped 2 hours into it and pulled loose in more areas, so I guess the next step is to keep decreasing the grit size until it can get all the way through the print. So I'll try 1000 grit next. I could see where it might be useful to have several different plates with different levels of sanding on each one to handle different prints. You could have one plate that isn't sanded at all for parts that don't warp and need to release easily. Then a plate with 1000 grit or less for real warp prone prints like this one I'm doing, and then something in between for parts with a lot of contact area that might be to hard to remove from the low grit plate.
This perforated tray half I'm testing with is a good warp test since it is thin wall tray where one side has no wall. Once the walls start getting printed is when the warp occurs. Having all the holes in the bottom also provides a good test for how even the surface is, since you get a dense pattern of circle outlines being printed across the majority of the platform surface. You can look at each circle to see if the bead is consistent in all areas. Low spots would result in the extrusion not sticking, while high spots would give you a flattened extrusion. I'm not seeing any issues with the surface not being level or having low/high spots though.
This perforated tray half I'm testing with is a good warp test since it is thin wall tray where one side has no wall. Once the walls start getting printed is when the warp occurs. Having all the holes in the bottom also provides a good test for how even the surface is, since you get a dense pattern of circle outlines being printed across the majority of the platform surface. You can look at each circle to see if the bead is consistent in all areas. Low spots would result in the extrusion not sticking, while high spots would give you a flattened extrusion. I'm not seeing any issues with the surface not being level or having low/high spots though.
Experience is what you get when you didn't get what you wanted.